Managing Point Clouds and Panoramic Images
This section explains the concept of local and remote data sources for point clouds and panoramic images. It describes how to convert point clouds from various input formats and add them to a local data source. It also covers how to correctly insert point clouds into a Revit document using different insertion modes and how to manage already inserted point clouds within the project.
- Data Sources
- Adding a Point Cloud to a Local Data Source
- Inserting Point Clouds
- Inserting Point Clouds from a Public URL
- Manage Point Cloud Locations in a Revit Document
Data Sources
Before inserting your first point cloud into an Autodesk Revit document using the Qbitec for Revit Plugin, you must first configure a data source. A data source is the location where your point cloud data is stored.
A data source can be either a local folder or a network drive / folder or a remote source in the cloud such as NavVis IVION.
Adding a new Data Source
If no data source has been configured yet and you click the Insert Point Cloud button in the Qbitec Ribbon, the Insert Point Cloud window will notify you that a new source must be created before a point cloud can be inserted.
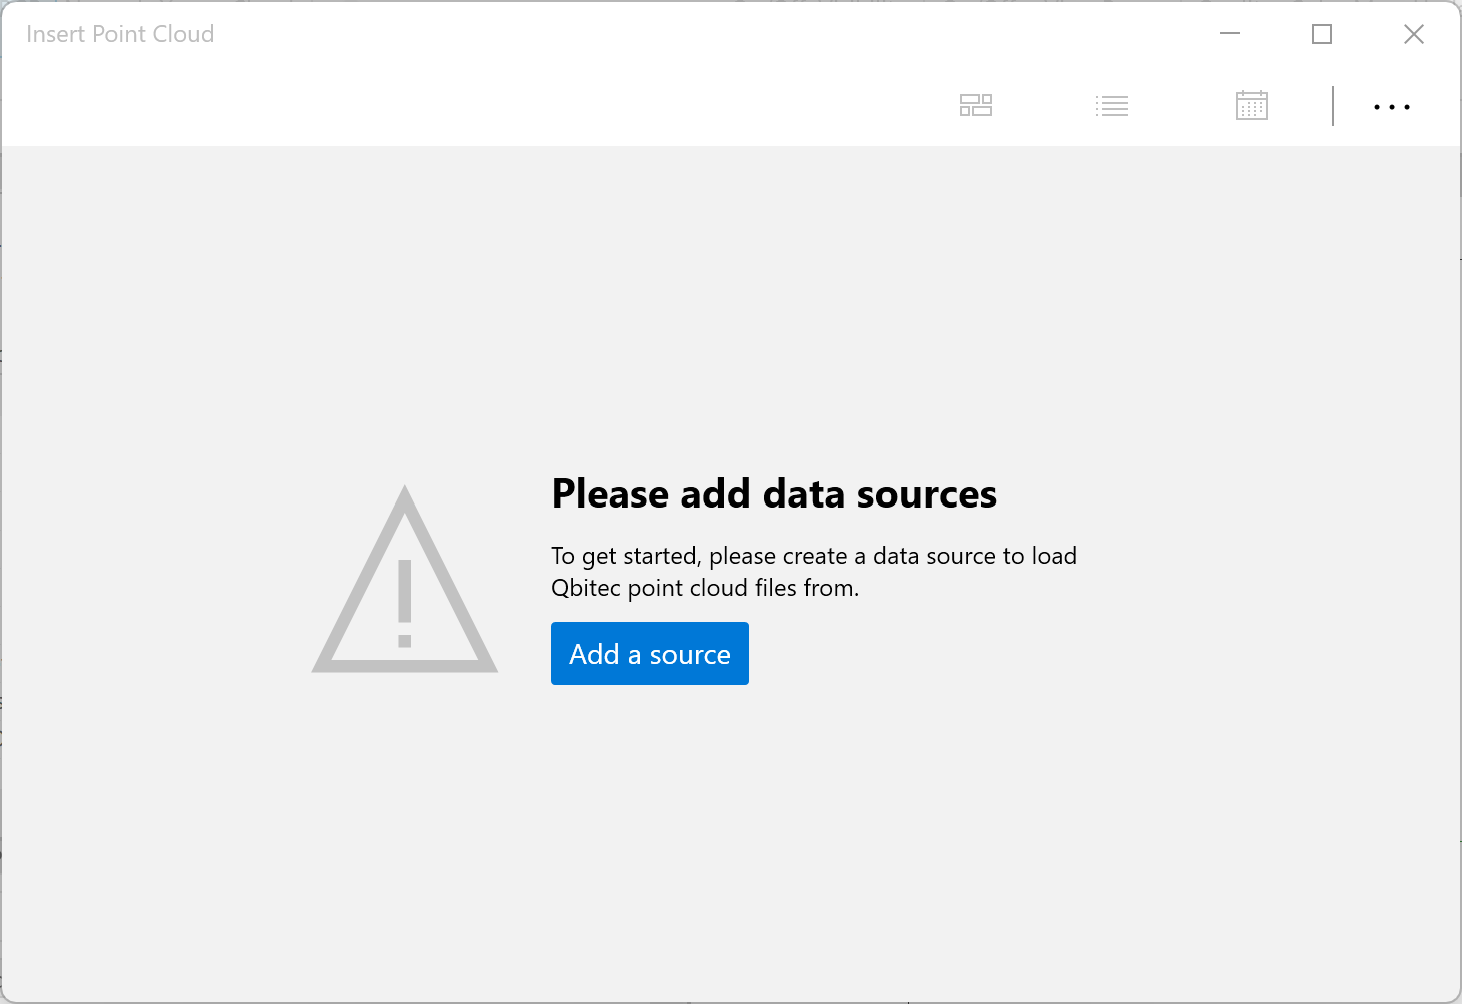
Click on the Add a source button to configure your first data source.
If data sources already exist and an additional one needs to be added, open the Qbitec Settings dialog via the Config/License button in the Qbitec Revit Plugin ribbon in Autodesk Revit.
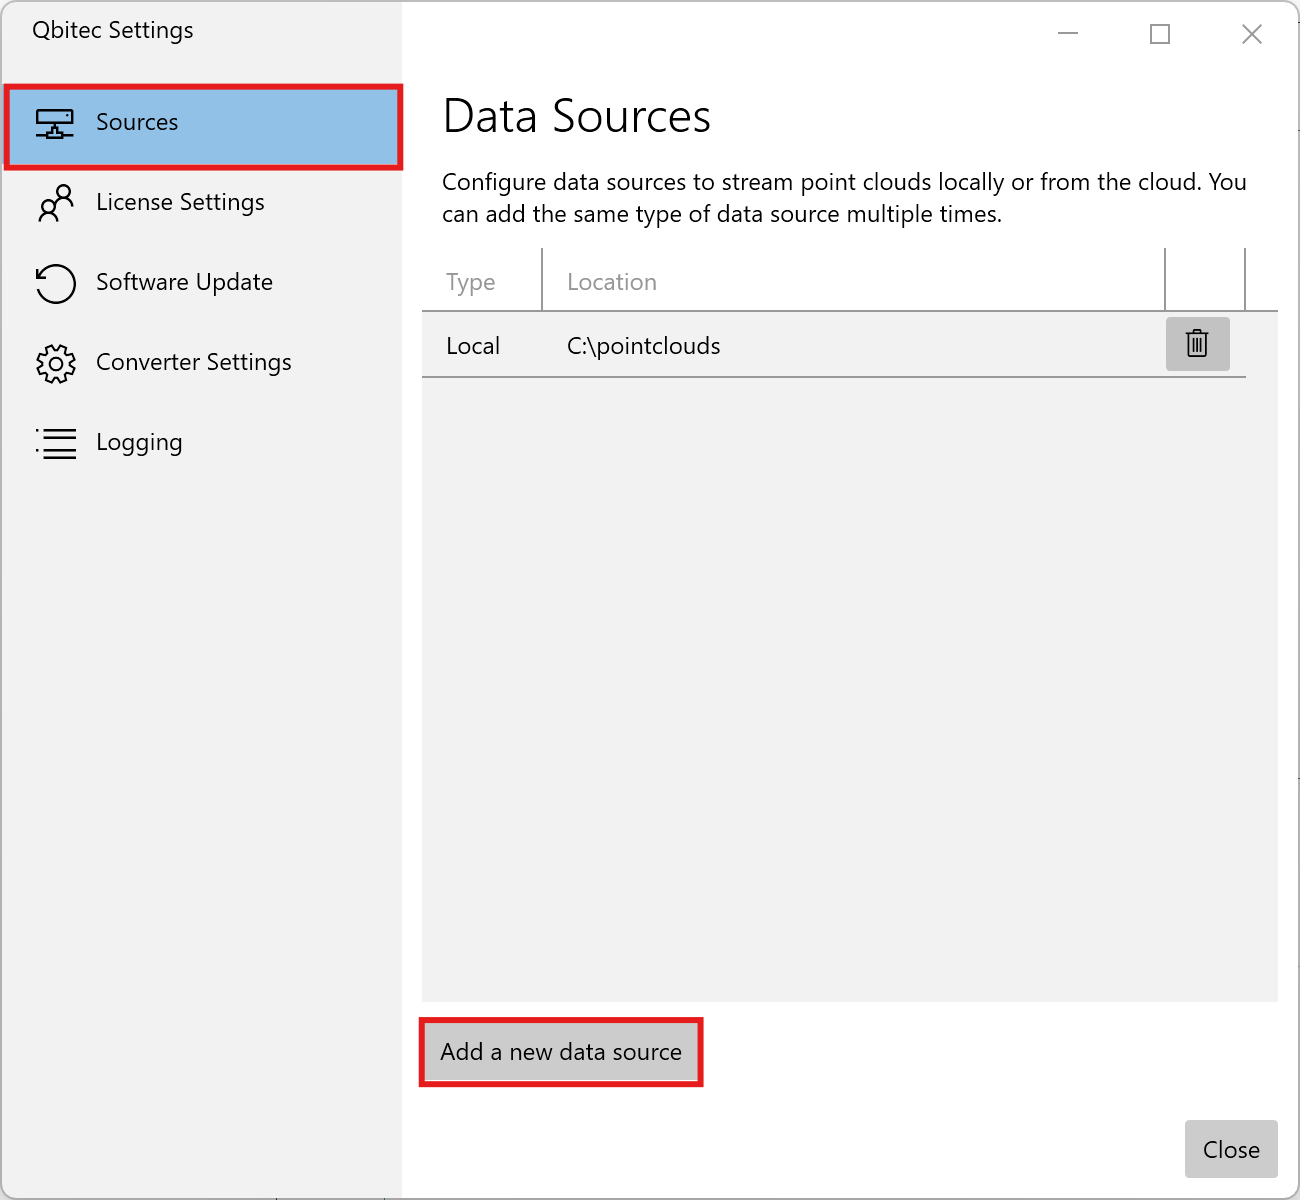
Then select Sources on the left side and click Add a new data source to start the wizard for creating a new data source.
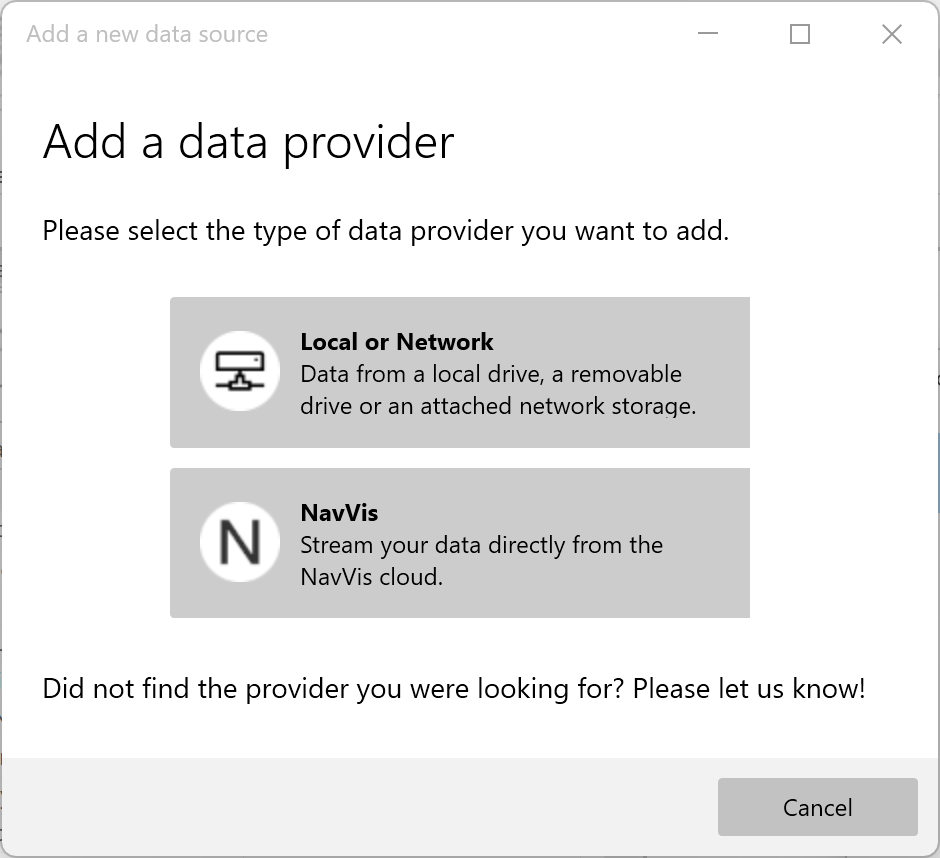
First you need to select the type of data provider which can be either Local or Network or a NavVis IVION instance.
Local or Network Sources
If you plan to store your point clouds in a folder on a local hard drive, an external USB drive, or a network drive path, you need to configure a local data source.
You can either select a folder that already contains Qbitec point clouds, or choose a new folder where Qbitec point clouds will be stored in the future.
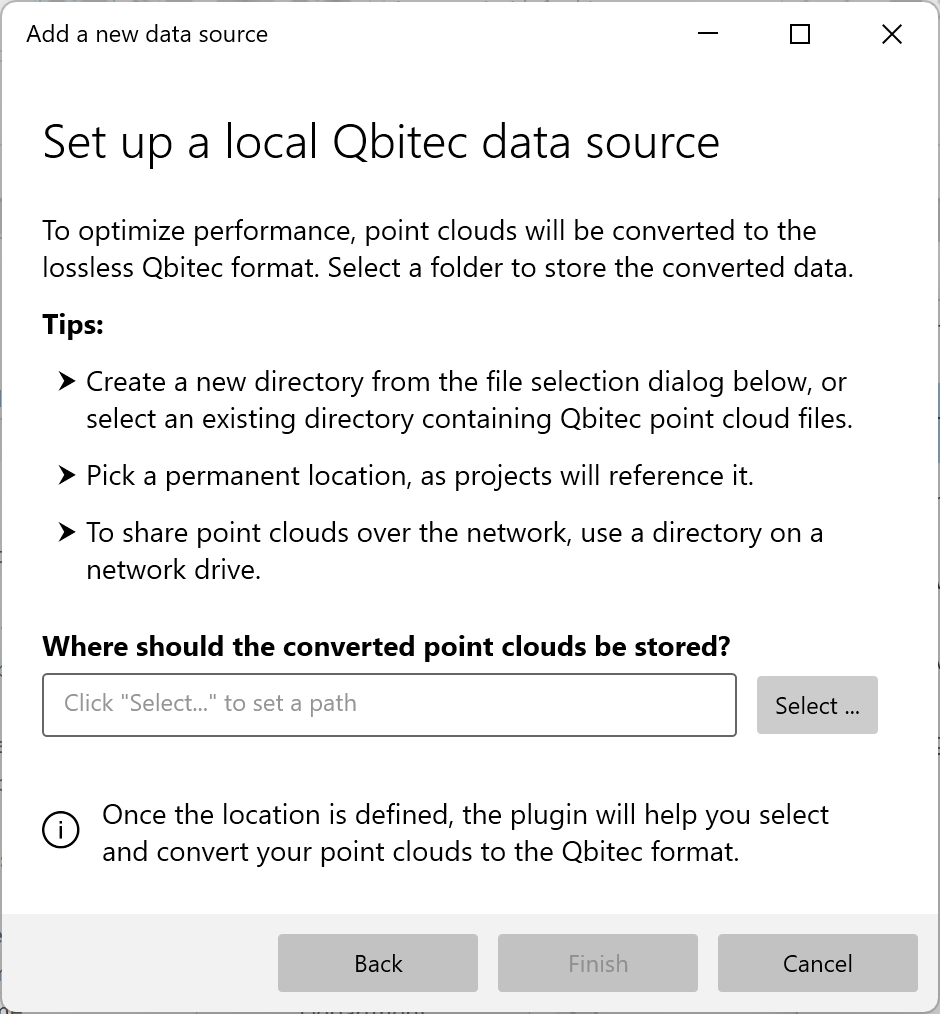
Point clouds that are not available in the Qbitec format—such as files in E57, Autodesk ReCap, or LAS/LAZ format—must first be converted.
The selected target path refers to the folder where the converted point clouds will be stored, not the location of the original source data.
Once a valid folder is selected click on the Finish button to complete the wizard.
To convert your first point cloud see Point Cloud Conversion section for more details.
NavVis IVION Sources
If you chose to set up a new NavVis Ivion instance as a data source you first need to provide the URL of the instance.
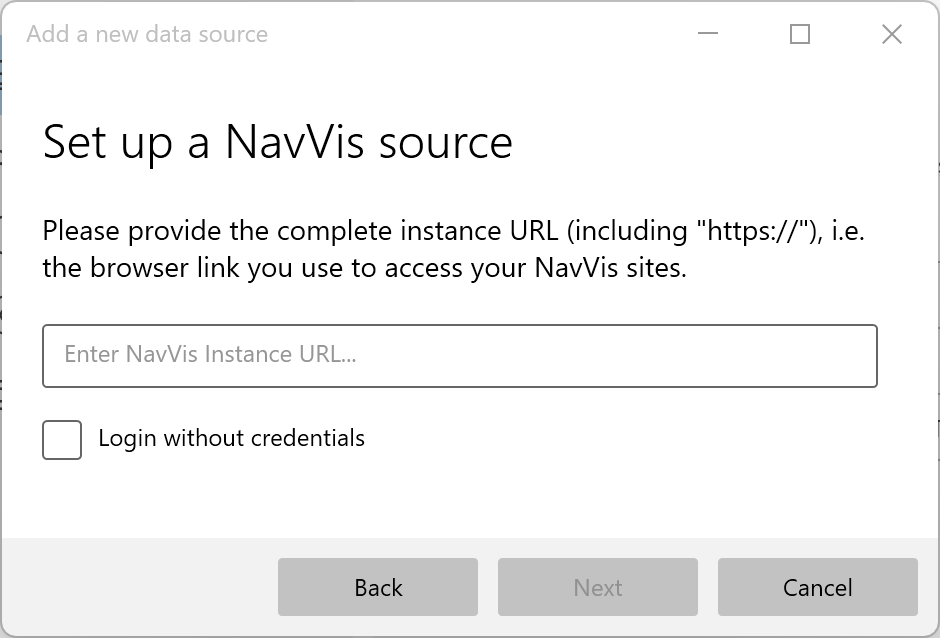
If access to the instance should be possible without credentials, the Login without credentials option must be enabled. If access is intended to require a specific login, this option must remain disabled.
Control over which data within the instance is accessible is managed entirely on the server side. Furthermore, the plugin operates in a strictly read-only manner. It does not perform any API calls to the NavVis instance that could modify or delete data.
When clicking Next, the connection to the instance is tested. If required, your default web browser will open to handle the login process. Enter your credentials and click Allow access.
Since the authentication process is handled entirely through the browser, the Qbitec plugin never has access to the actual password. As a result, the same rules apply as when accessing the NavVis web interface in a browser—for example, regarding password storage via password managers or the use of SSO mechanisms.
Complete the creation of the NavVis source by clicking the Finish button.
Manage Existing Data Sources
To manage existing data sources open the Qbitec Settings dialog and select Sources on the left.
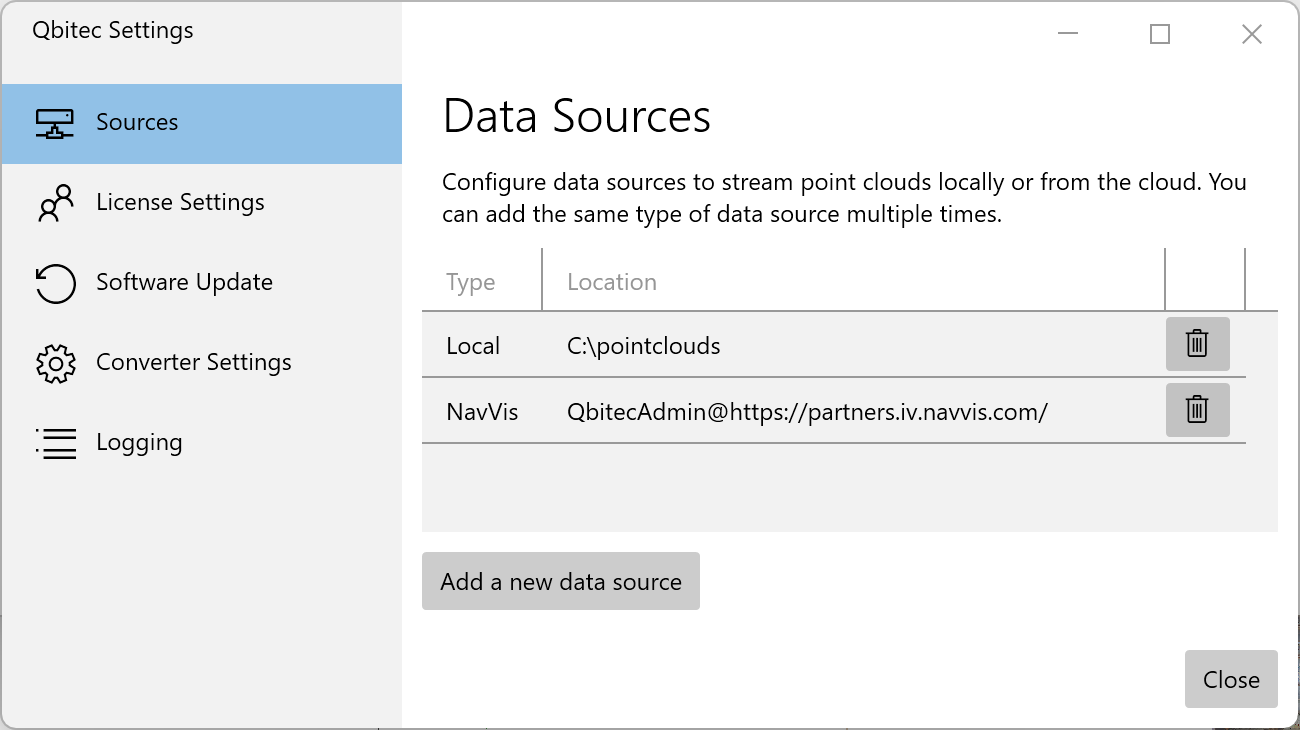
Under Data Sources, a list of all configured data sources is displayed, including their associated type and location.
A data source can be removed using the button with the trash can icon. This action only removes the reference to the respective data source; the underlying data itself is not deleted!
Adding a Point Cloud to a Local Data Source
Point clouds and panoramas can exist in a wide variety of formats. However, most of these formats are optimized for data exchange rather than for efficient processing and visualization.
To add point clouds with its associated panoramas to a local data source they need to be converted into the Qbitec format.
The following wide range of input file formats are supported:
Supported File Formats
| Format | Point Coud | Panoramic Images |
| E57 | yes | from spherical images and from structured scans |
| Las/Laz | yes | does not contain panoramic images |
| Recap® RCP/RCS | yes | (from structured scans) |
| Zoller + Fröhlich ZFS | yes | no |
| Riegl RSP | yes | no |
| Riegl RPP | yes | no |
Workflow
To add / convert a new point cloud into a local data source first open the Insert Point Cloud dialog by clicking on the Insert Point Cloud button in the Qbitec ribbon:
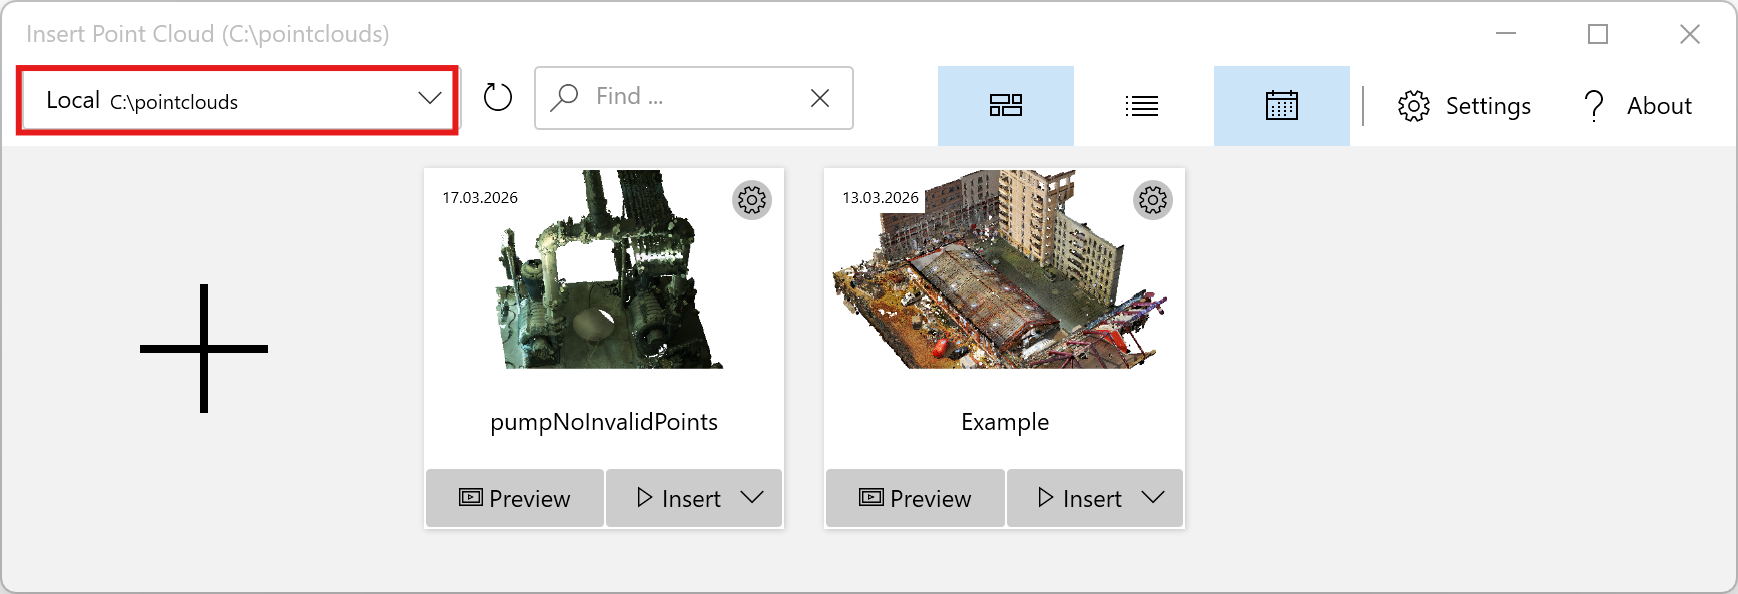
Select the local data source you want to add the point cloud to in the top left combo box:
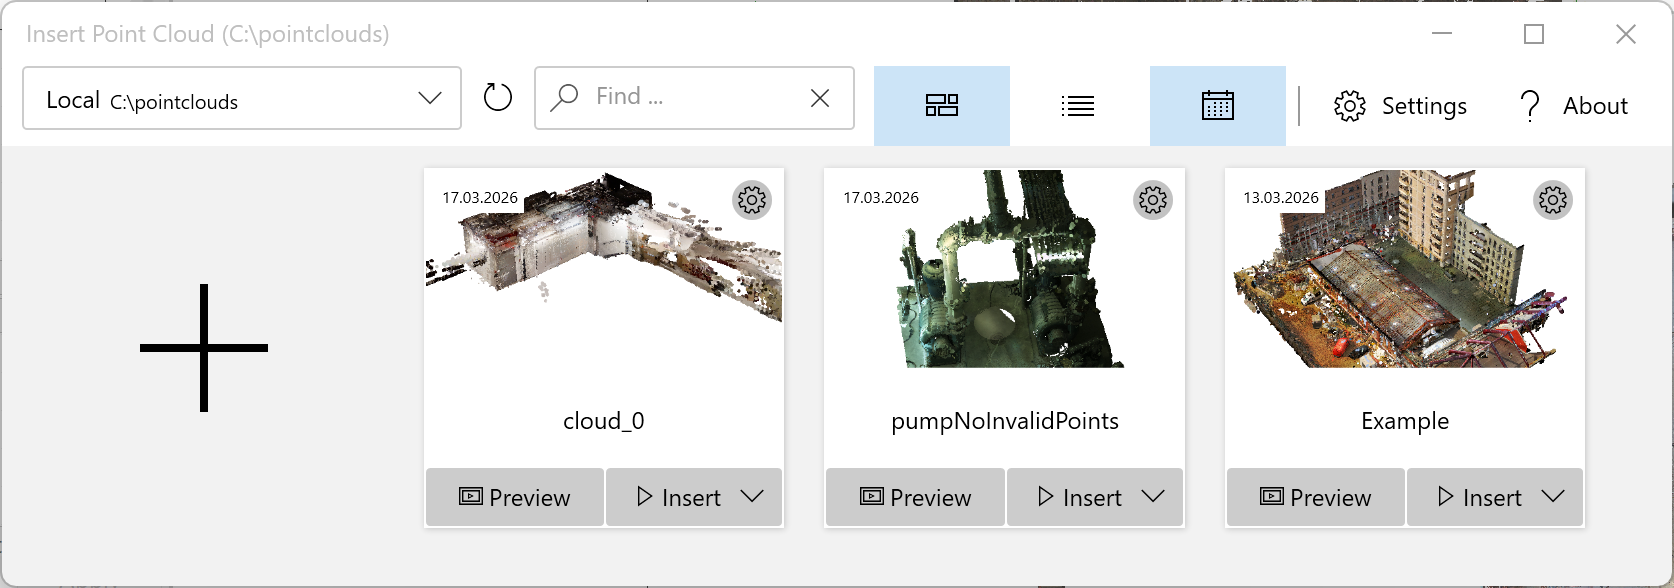
Click on the large '+' Symbol to open the Add a new Point Cloud Wizard.
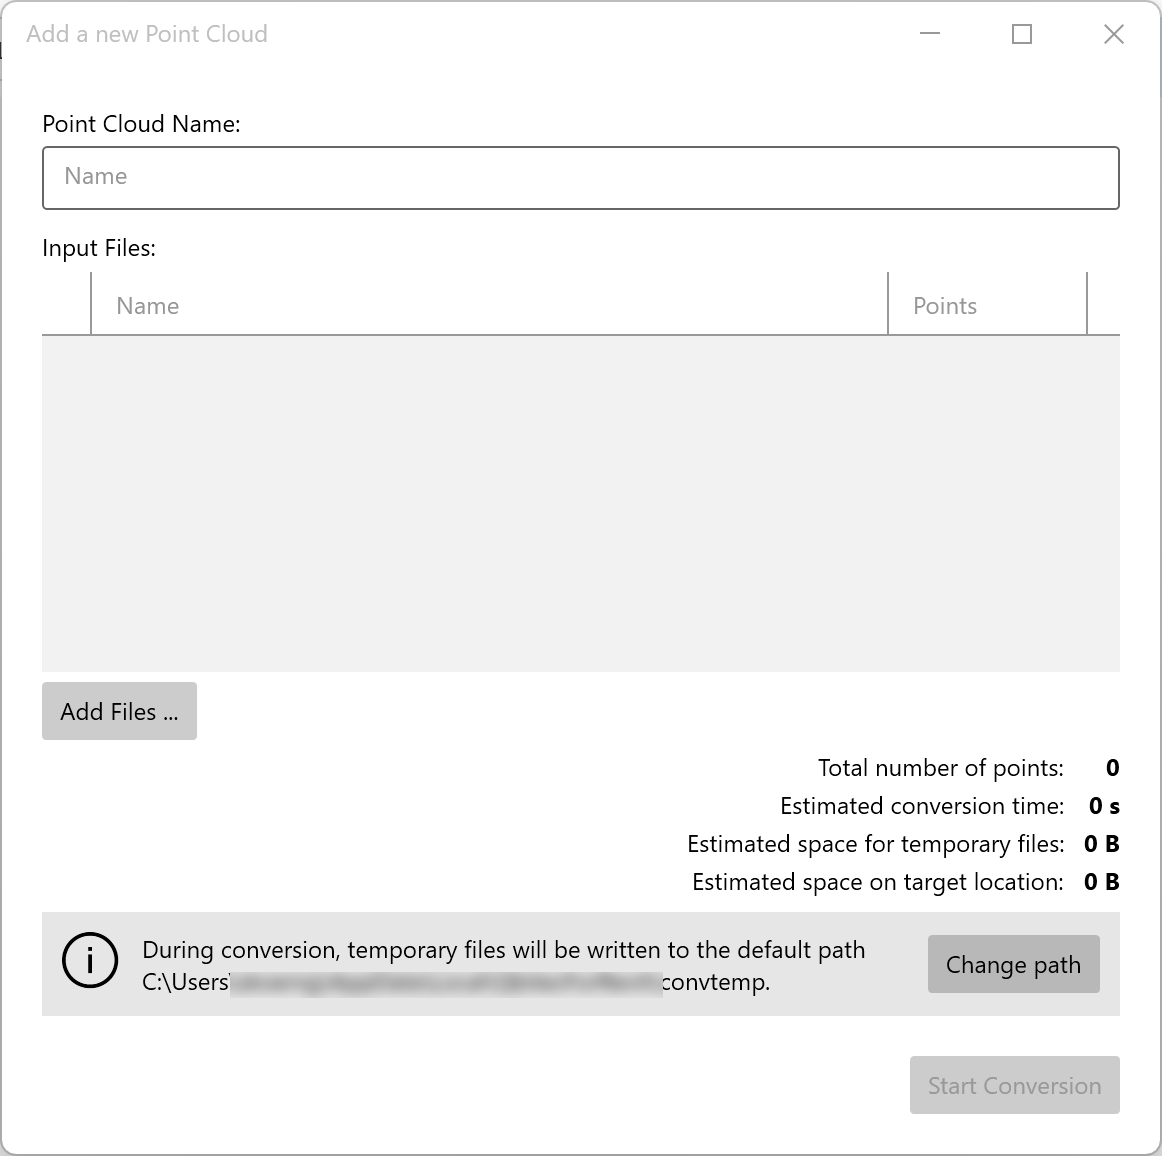
Then add one or more input point cloud files to convert into a single Qbitec point cloud.
Adding Files:
- Click Add files... to open a file browser
- Select one or more point cloud files (e57, rcp, or other supported formats)
- Repeat to add additional files
- As files are added, the total point count and conversion estimates update automatically
Important Notes:
- All selected source files will be merged into a single point cloud, which is preferable as it can yield better performance. To create multiple separate point clouds, convert files individually.
- Only merge multiple point clouds which are registered to the same reference coordinate system.
Choose a Point Cloud Name:
A unique name for the point cloud is automatically generated. If you wish to use a different name, enter it in the Point Cloud Name field before starting the conversion.
Start Conversion:
Click Start Conversion to begin processing the files. The conversion runs independently of Revit, allowing you to continue working. You'll receive a notification when conversion is complete.
Conversion Settings:
Processing, in some cases, very large point clouds makes it impractical to keep all conversion data entirely in memory. Therefore, the conversion algorithm requires a location where temporary data can be offloaded from memory to disk. This temporary path can be configured and modified in the conversion settings. It is important that this path resides on a fast local drive and provides sufficient storage capacity. After a successful conversion, the temporary data is deleted.
- The initial temporary path for file conversion is set automatically
- Click Change path to change the location if needed
- Ensure sufficient free disk space is available for temporary files (they are removed after conversion)
If you later want to change the path to a different location, this setting can alternatively be found in the Qbitec Settings under Converter Settings: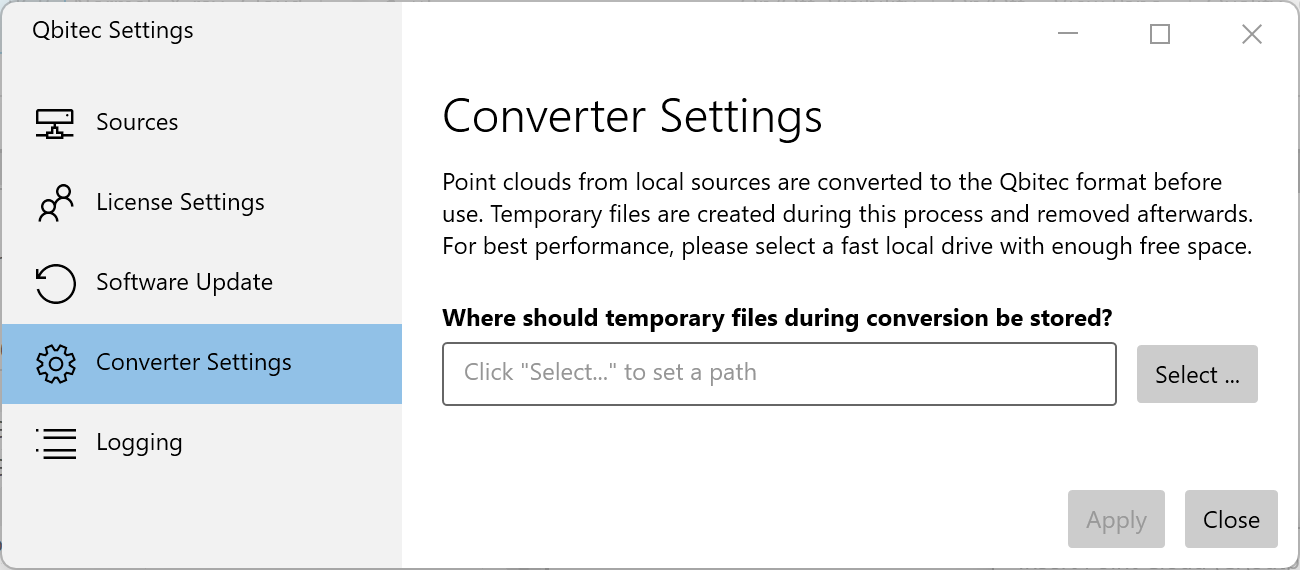
Inserting Point Clouds
To insert a point cloud into your Revit document click on the Insert Point Cloud button inside the Qbitec Ribbon to open the Insert Point Cloud dialog.
While the main purpose of this dialog is to insert the relevant point clouds into your Revit document, it also enables you to browse, sort, filter, preview, and inspect the metadata of all datasets from specific data sources.
Workflow Overview
- First, select the data source that contains the point cloud you want to insert.
- Search the list of point clouds for the specific dataset.
- Click on the Insert button and choose the appropriated Insertion mode.
Select a Data Source
Data sources are selected using the Data Source Selector combo box at the top left. Once a data source has been selected, the list of point clouds is updated. If any external changes have occurred in the data source—for example, if a point cloud was deleted or copied using Windows File Explorer—click the Refresh icon next to the Data Source Selector to reload the point cloud list.
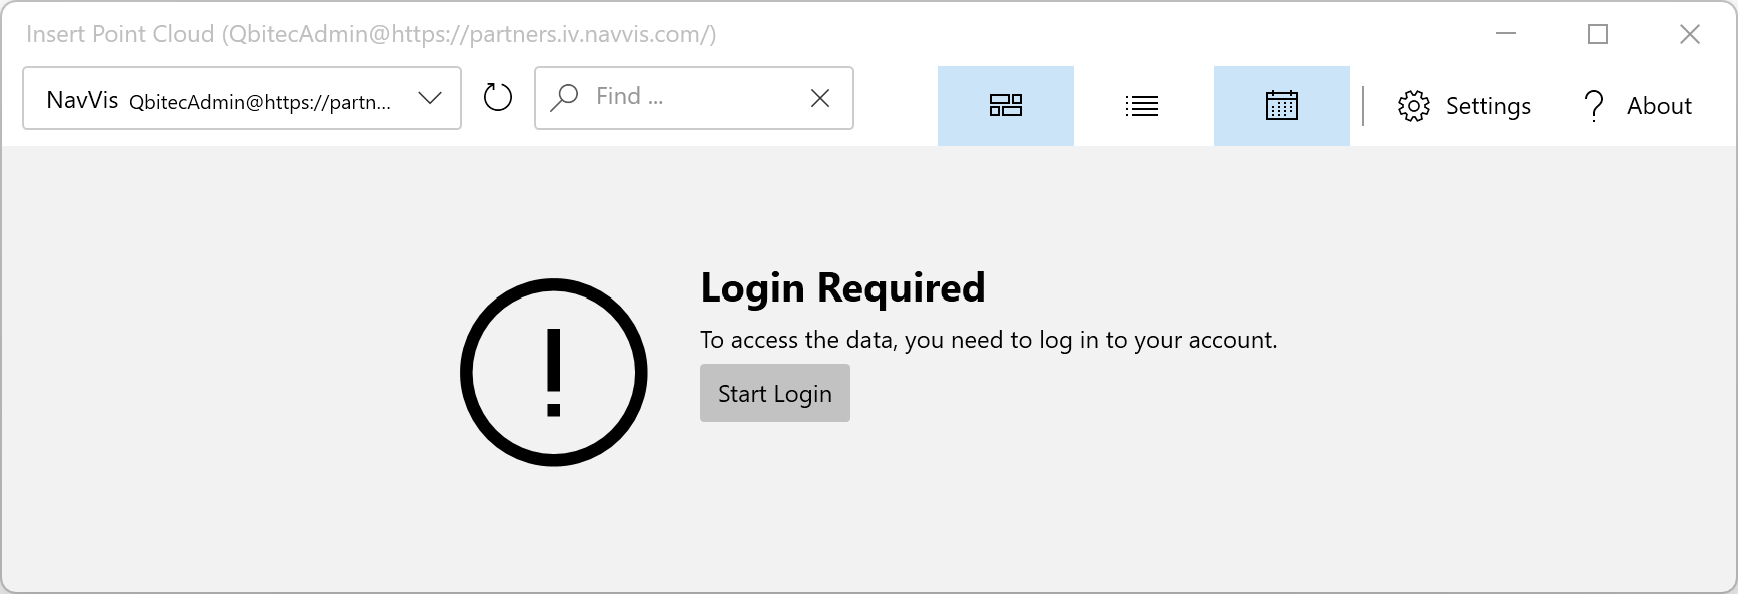
When a remote source is selected, the dialog may prompt you to log in before displaying the contents of the data source.
Filtering the Point Cloud List
To filter the list of point clouds, enter a substring in the Find text field.

You can see a live preview of the search results as you type. Point clouds are also sorted by search match quality.
Tile and List View
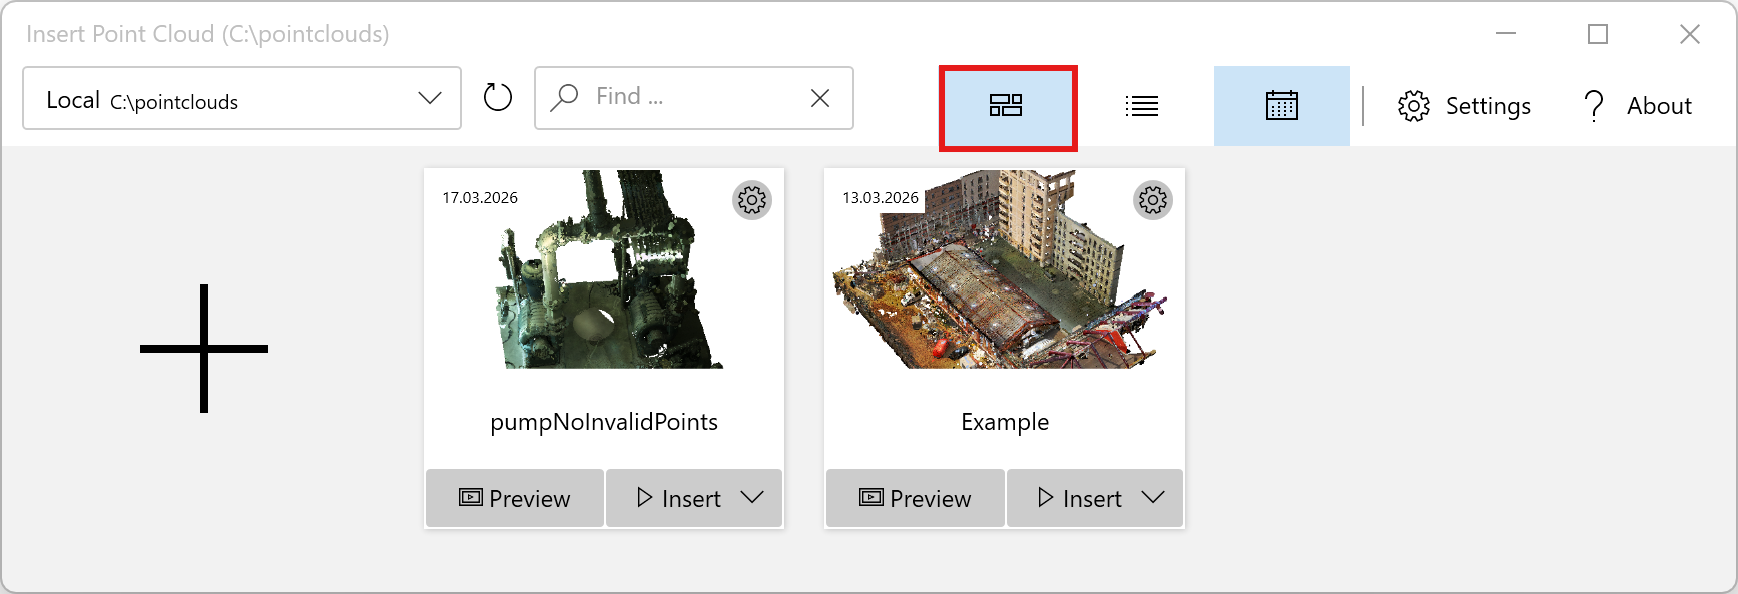
To browse the list of point clouds you can choose between the tile view and the list view by clicking onto the corresponding icon buttons.
Here the list of point clouds is displayed using the Tile View:
and here you can see the same content displayed using the List View:
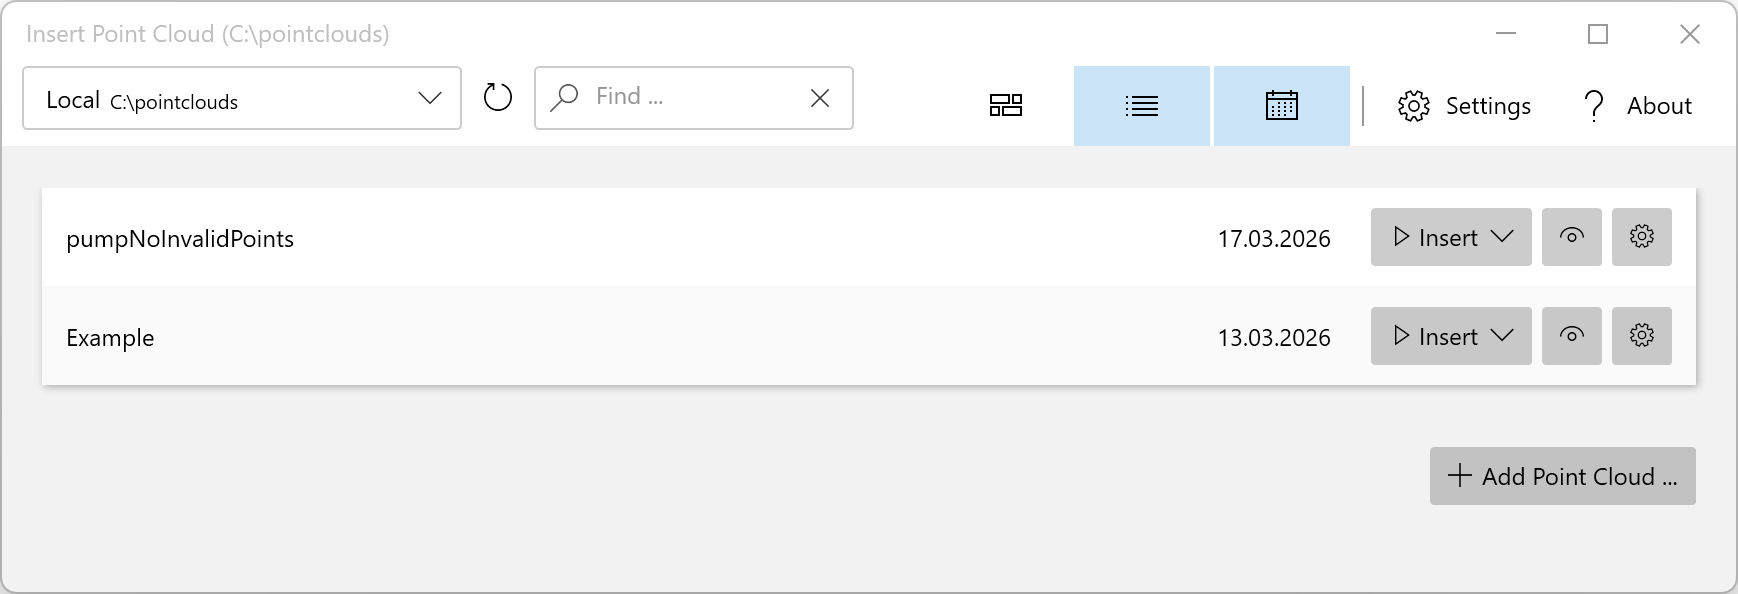
Tile view provides a thumb nail preview, making it easy to recognize point clouds, but it shows fewer items at once and metadata is less visible. List view displays more items compactly, allowing easy sorting, filtering, and comparison of metadata, though it is less visually appealing and previews are not prominent.
Sorting Point Clouds
Point clouds are typically sorted alphabetically, but you can also sort them by date by clicking the calendar icon.

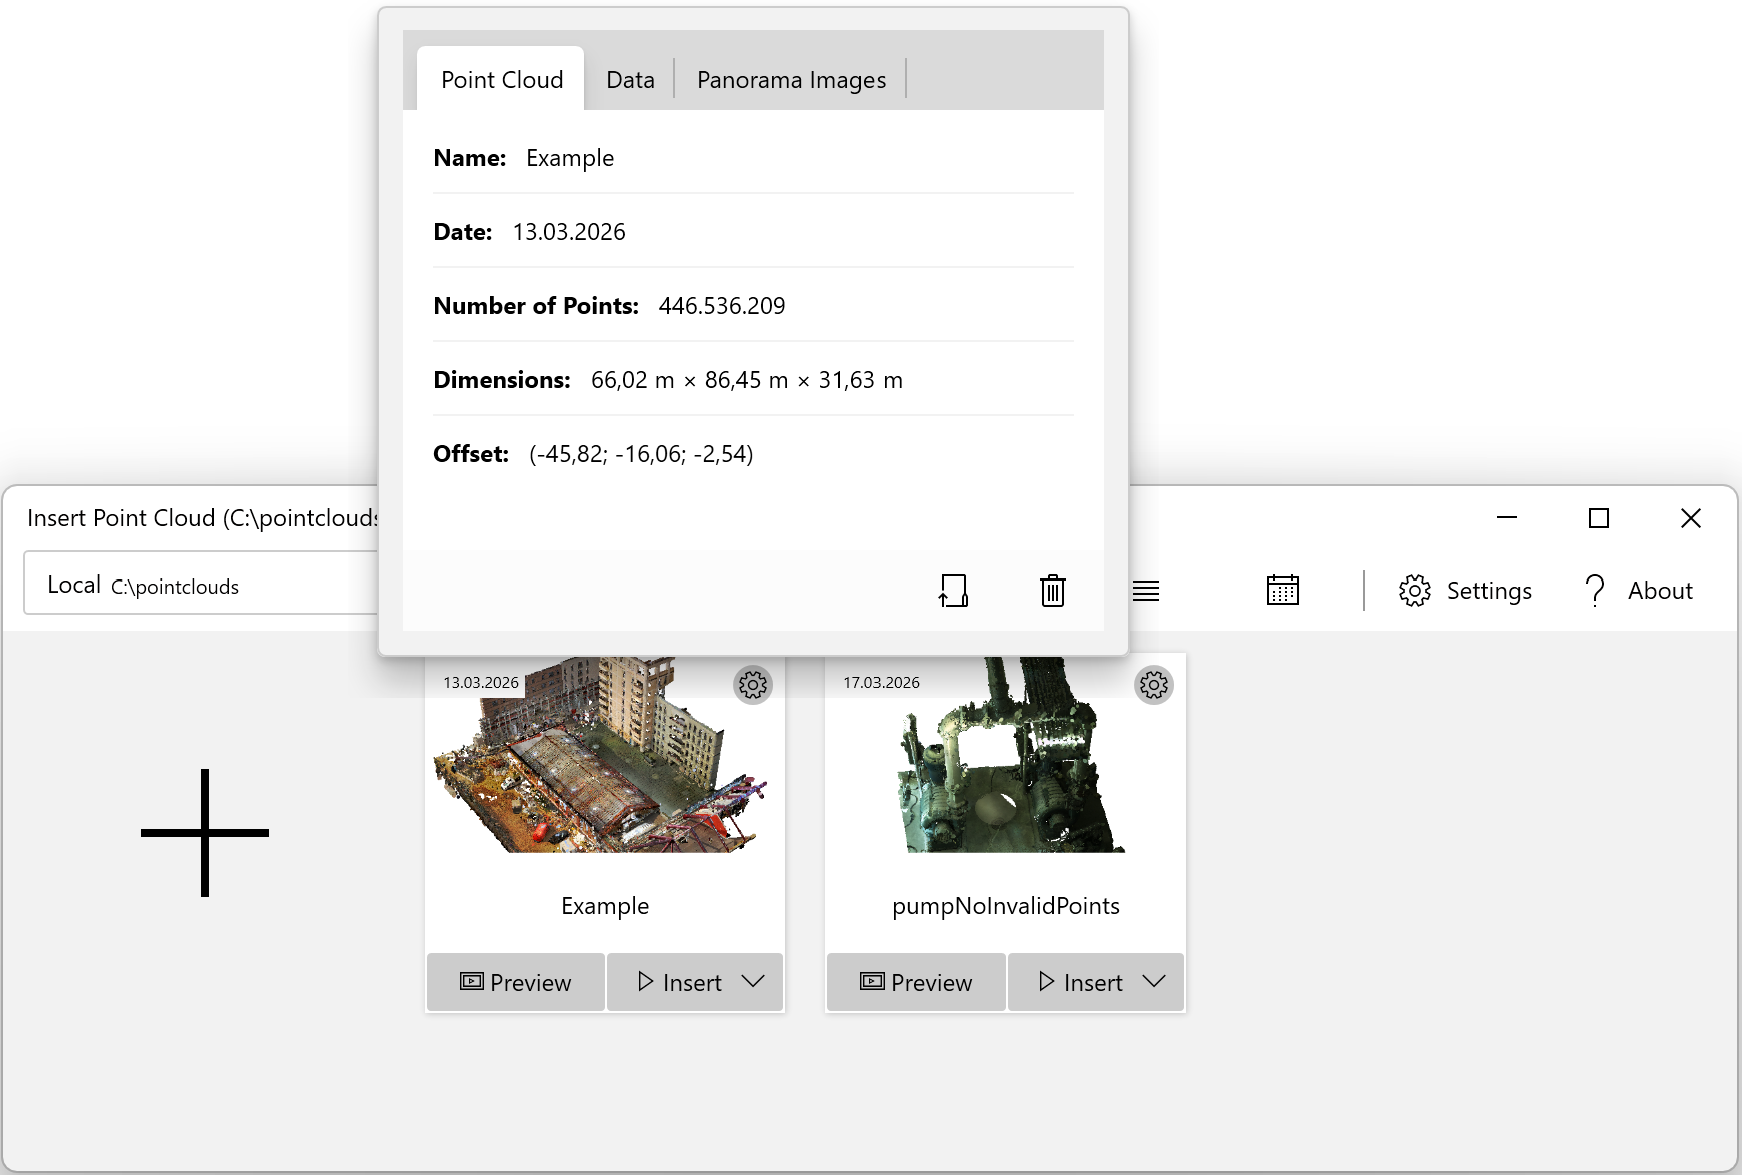
Inspecting Point Cloud Meta Data
You can inspect the metadata either by hovering over a dataset with the mouse cursor or by clicking the gear icon of a point cloud to view more detailed information.
Interactive 3D Preview
Sometimes the auto-generated point cloud thumbnail is not sufficient to identify the required dataset. In that case, you can also inspect the point cloud before inserting using a small interactive 3D view by clicking the Preview button. Inside the preview window, you can zoom, rotate, and pan the camera using the mouse to focus on your personal point of interest.
Insertion Modes
The insertion mode determines where the point cloud will be placed relative to the respective coordinate systems.
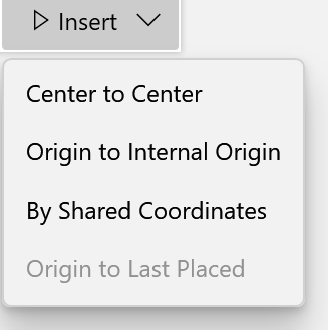
- Center to Center - Aligns the point cloud center with the center of the project center
- Origin to Internal Origin - Places the point cloud origin at the internal project coordinate system origin
- By Shared Coordinates - Geo referenced point clouds are placed correctly if the survey coordinate system has been set correctly beforehand, e.g. using Set Survey Coordinate System
- Origin to Last Placed - Positions relative to the previously placed point cloud (available after the first point cloud was inserted)
Hint: If you can't see the point cloud after insertion switch to a site plan, side view or to a 3d view. The point cloud may be clipped in some specific view e.g. because level height may not be setup correctly at the beginning.
Inserting Point Clouds from a Public URL
The Qbitec plugin support to insert Potree 2 point clouds from a public available URL directly into Revit.
Potree 2 point clouds consist of three files:
- metadata.json
- octree.bin
- hierarchy.bin
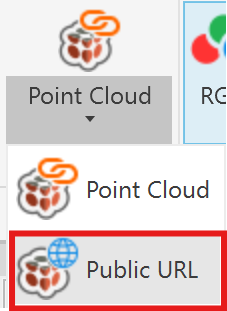
To insert such a point cloud into Revit go to the Qbitec Ribbon and click on Insert Point Cloud and then on Public URL.
Then enter the URL of the containing path of the three file e.g. https://qbitec.com/pc
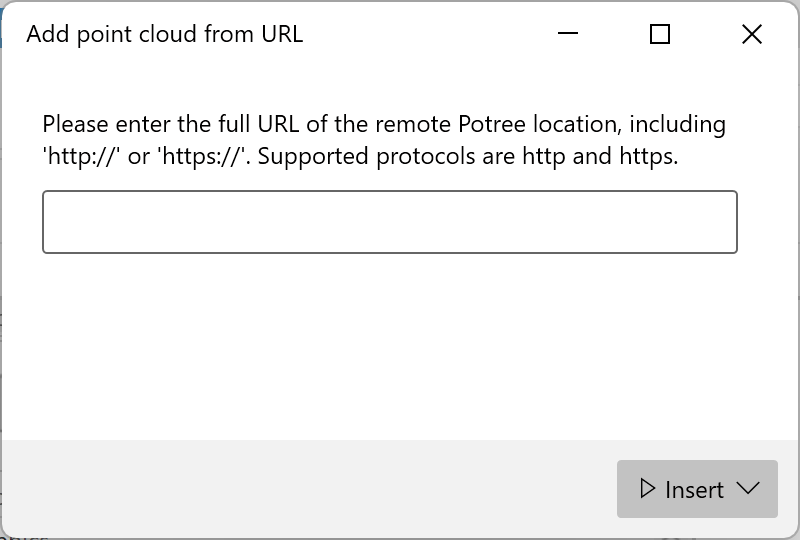
Finally click on the Insert button. You have the same Insertion Modes available as for other point clouds.
Supported Point Cloud Formats
Currently it is not supported to access non-public PoTree URLs which needs some kind of authentication or access token.
The following streaming file formats are currently supported:
- PoTree Version 2.0
- PoTree Version 1.7
- Entwine (experimental)
Panorama Support (for public / self hosted point clouds)
Since version 1.8.6, we also support inserting panoramic images associated with a point cloud.
The panoramic images must be hosted on the web server using the same folder structure and file format produced by our local file converter (version 1.8.6 or later).
All panoramic images are stored as equirectangular images in JPG or PNG format inside a panoramas subfolder of the point cloud folder. Each image has a corresponding JSON file containing relevant metadata, such as the image resolution, position, and orientation.
https://example.com/path/to/pointcloud/
├── ... point cloud files
└── panoramas/
├── panoramas.json (the panorama index file)
├── pano0.json (meta data file)
├── pano0.jpg (equirectangular image file)
├── panoXY.json
├── panoXY.png
└── ...
The panoramas folder must also contain a panoramas.json index file listing the available panoramas.
Depending on the size of the panorama images and the available internet bandwidth, opening panoramas from a remote URL may take a few moments. However, the images are cached locally during a Revit sessions to significantly reduce loading times when they are opened again.
Manage Point Cloud Locations in a Revit Document
The Manage Point Cloud Locations dialog allows you to assign, manage, and remove locations for point clouds used in the project. To open the dialog click on the Manage Point Clouds button in the Qbitec ribbon.
A single point cloud can have multiple possible locations, and the system automatically checks these locations from top to bottom and uses the first available location.
This allows multiple users or machines to work with the same project even if point clouds are stored in different locations or require individual credentials to a remote source.
Typical Use Cases
Local Point Clouds
- A point cloud was moved to a different folder and the path must be updated.
- Multiple users work on the same Revit project but store point clouds in different local directories.
- An updated version of a point cloud should transparently replace the existing file.
Example:
User A inserts a point cloud from the path C:\Users\UserA\Projects. User B works on the same project but stores their point clouds in C:\Users\UserB\MyOtherProjects.
When User B opens the project for the first time, they can add their directory as an alternative search location. When the project is opened: User A uses the first location C:\Users\UserA\Projects, while User B automatically uses the alternative location C:\Users\UserB\MyOtherProjects.
Remote Point Clouds (e.g., NavVis IVION)
- Multiple users access the same point cloud with individual login credentials.
- User credentials or the remote instance have changed.
- The project is opened on a new machine where the remote source is not configured yet.
Example:
When User B opens the project for the first time, they add their own credentials to the point cloud location. Afterward: User A automatically connects using UserA, while User B connects using UserB.
Dialog overview
The following screenshot shows the main areas of the Manage Point Cloud Locations dialog.
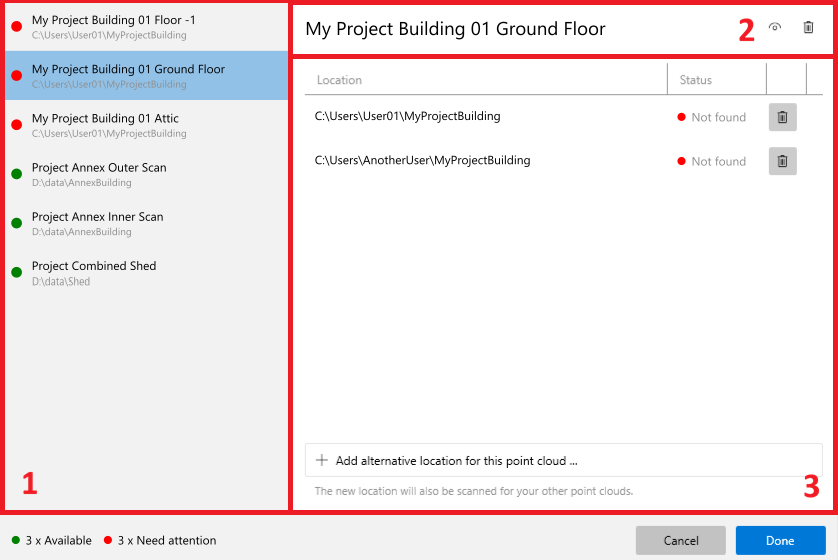
1 Point Cloud List
The left side of the dialog displays the list of point clouds used in the project. Each entry contains the following information:
- Name: The name of the point cloud.
- Selected Path: The currently active location.
- Availability Indicator: Shows whether the point cloud can be found at the selected location. A green dot means the point cloud is available; a red dot means it is unavailable and needs attention.
Click a point cloud entry to display its details on the right side of the dialog.
2 Header Area
The header area shows the selected point cloud name and provides the following actions:
- Preview Point Cloud
Opens a popup 3D view showing the point cloud. This button is only enabled if the point cloud is available. - Schedule for Removal
Marks the point cloud for removal when the dialog is confirmed. The point cloud name is displayed with strikethrough text. Clicking the button again before confirming reverts the removal.
3 Locations Area
The locations area lists all stored locations for the selected point cloud. The list is evaluated from top to bottom: the first available location is used.
Location
Shows the current location, for example C:\Users\User01\MyProjectBuilding (local path) or UserA@myinstance.iv.navvis.com (NavVis location).
Status
Shows the availability of the point cloud at the location.
The following status values are possible:
| Status | Description |
|---|---|
| OK | The point cloud is available at this location. |
| Not Found | The point cloud is not present at this location. |
| Needs Setup | Remote locations only. Availability cannot be determined because the remote source is not set up. |
| Needs Login | Remote locations only. Availability cannot be determined because you are not logged in. |
Button "Add Alternative Location for this Point Cloud"
If no suitable source is available, or if you select the last entry Add Location ..., the corresponding setup wizard starts.
| Point Cloud Type | Wizard |
|---|---|
| Local Point Clouds | A directory selection dialog is shown. |
| NavVis Point Clouds | The NavVis project source setup dialog is shown. |
| HTTP Point Clouds | A dialog to enter a HTTP address is shown. |
After source creation or selection, the location is scanned for the selected point cloud. If found, the location is added. Otherwise, an error message is shown.
Automatic detection of related point clouds
When a valid location is found for the selected point cloud, the system also scans the parent directory (or the remote location) for other point clouds belonging to the same project. If additional project point clouds are discovered there, you will be asked whether their locations should be updated as well.
This allows multiple point clouds to be reassigned with only a few clicks instead of updating each one individually.
Example
Assume the new location for the current point cloud is C:\MyPointClouds\PC_A. If another point cloud of the same project exists at C:\MyPointClouds\PC_B, it will automatically be detected because it is located in the same parent directory.
You can then choose to update this additional point cloud location as well.
Location Actions
The following actions are available depending on the current status of the location.
| Action | Required Status | Description |
|---|---|---|
| Remove Location | All states | Removes the location from the list of possible locations for the selected point cloud. |
| Set Up | Needs Setup | Starts the project source setup wizard for the remote source. A new remote location is configured using the same instance URL but you may choose the same or a different user name for the connection. |
| Log In | Needs Login | Starts the login process for the remote source. The user mentioned in the location (the part before the @) must authenticate to access the point cloud. |
Applying the changes
Once point cloud locations have been updated, or point clouds have been scheduled for removal, click the Done button to apply the changes and store the alternative paths in the project. A dialog will appear requesting you to save and reload your project.