In this tutorial you will learn how to
- Download and install the Qbitec plugin for Autodesk® Revit® software,
- Activate the plugin with your license data,
- Add a local data source,
- Convert a point cloud to Qbitec's optimized format, and
- Insert a local point cloud into a Revit® project
Need a point cloud to test with? You can download an example point cloud in e57 format here (6GB)
Step 1: Download and Install Qbitec for Revit

- Grab the newest version from the download page: https://qbitec.com/Download by clicking "Download the latest version"
- Close Revit if you have it open
- Run the installer QbitecSetup-x.x.x.exe
- Follow the installer instructions
Step 2: Activate your License

- Start Revit
- Open an existing project or start a new project
- Look for the Qbitec tab to access the Qbitec ribbon
- On the "Qbitec Ribbon" click the button "Config/License"

- A dialog will ask you for an e-mail address and password.
- Enter your license credentials
- Click "Activate"
Need a license? If you do not have a license, you can get a free and non-binding trial here: Get Your Trial
Step 3: Add a Local Data source

- Stil within the dialog "Qbitec Settings" switch to the panel "Sources".
- You see an (empty) list of data sources. On the lower left click "Add a new data source".

A new dialog opens. Click "Local or Network" to start the setup wizard.
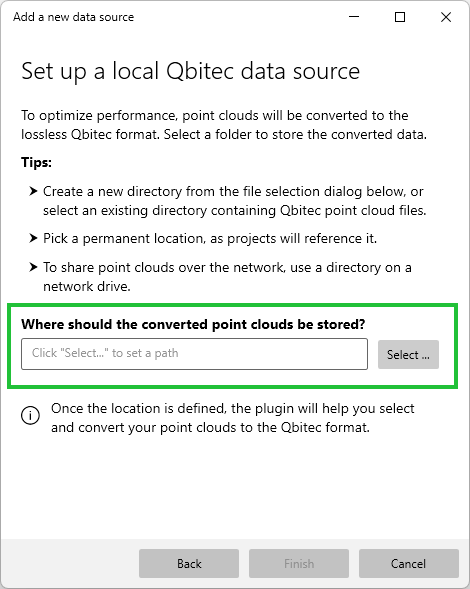
A new dialog opens. Enter the path for the converted point clouds here. Please select a path on your local hard drive or your network storage.
Please note: The path for the resulting point clouds is not the same as the path where you store your source point cloud files (in e57, rcp, or other formats). It is a new path that will contain the point clouds generated after the conversion process.
Once the path has been set, press "Finish" to complete the data source setup.
Step 4: Convert a point cloud
In the "Qbitec" ribbon click "Insert Point Cloud"
You should now see a window with a central button "Add your first point cloud". Later, this window will contain all converted point clouds.
Click "Add your first point cloud" to open the "Add a new Point Cloud" window

A new dialog opens, allowing you to specify the source point cloud files to convert.
- On the lower left of the new window, click "Add files ..."
- A file browser will open, allowing you to select one or many files
- Repeat step 1 for all files you would like to add. While you are adding files, the point count and some estimates will update.
- Click "Start Conversion" once all files have been added
Please note: All source point clouds specified here will be merged to a single point cloud. If you want to create multiple point clouds, please convert the files one by one.
You will see a warning in the lower section indicating that a path for the temporary files has been automatically selected for the conversion process. These temporary files will be stored here during the conversion and removed afterward. Please ensure that there is sufficient free disk space. If you wish to change the path, click on "Set Temporary Path".
Need a point cloud to test with? You can download an example point cloud in e57 format here (6GB)

The "Add a new Point cloud" dialog closes and a new tile appears on the point clouds overview. It contains the following elements:
- the date of creation on the upper left
- an estimated time, when conversion will be done and
- a progress ring
Also it contains a "Cancel" button that will stop the conversion.
Also you will notice that a new process started in your Windows' tray bar, which informs you that conversion started. As the conversion happens independently of Revit you can close the dialog and continue working. You will receive a tray message once conversion is done. You can then re-open the "Insert Point Cloud" window to insert the point cloud into your Revit project.
Step 5: Insert a Point Cloud into Revit

After conversion is complete, you see a tile with two options:
- "Preview" to open a 3D preview window that shows the point cloud in an interactive viewer
- "Insert" to insert the point cloud into your project
Clicking "Insert" reveals a menu with these options:
- "Center to Center": Place the point cloud center at the project center
- "Origin to Internal Origin": Place the point cloud's origin at the origin of the internal coordinate system
- "By Shared Coordinates": Place the point cloud according to geo coordinate system
- "Origin to Last Placed": This field is available if a point cloud is already in your project. It will place the new point cloud in relation to the last point cloud, making it possible to correctly assume subsequent point clouds of a site, once the first point cloud has been positioned.
Well done!
And there you have it! If you have any questions, please reach out to us via support@qbitec.com.