In this tutorial, you will learn:
- How to turn your point cloud into a streamable format using the Potree encoder
- How to adapt the free Potree viewer to use your point cloud
- How to deploy it to your webspace to make it publicly available
Prerequisites:
- A webspace that supports direct file access,
- A point cloud
- A text editor, and the courage to touch a few lines of website code
The converter and the viewer are free.
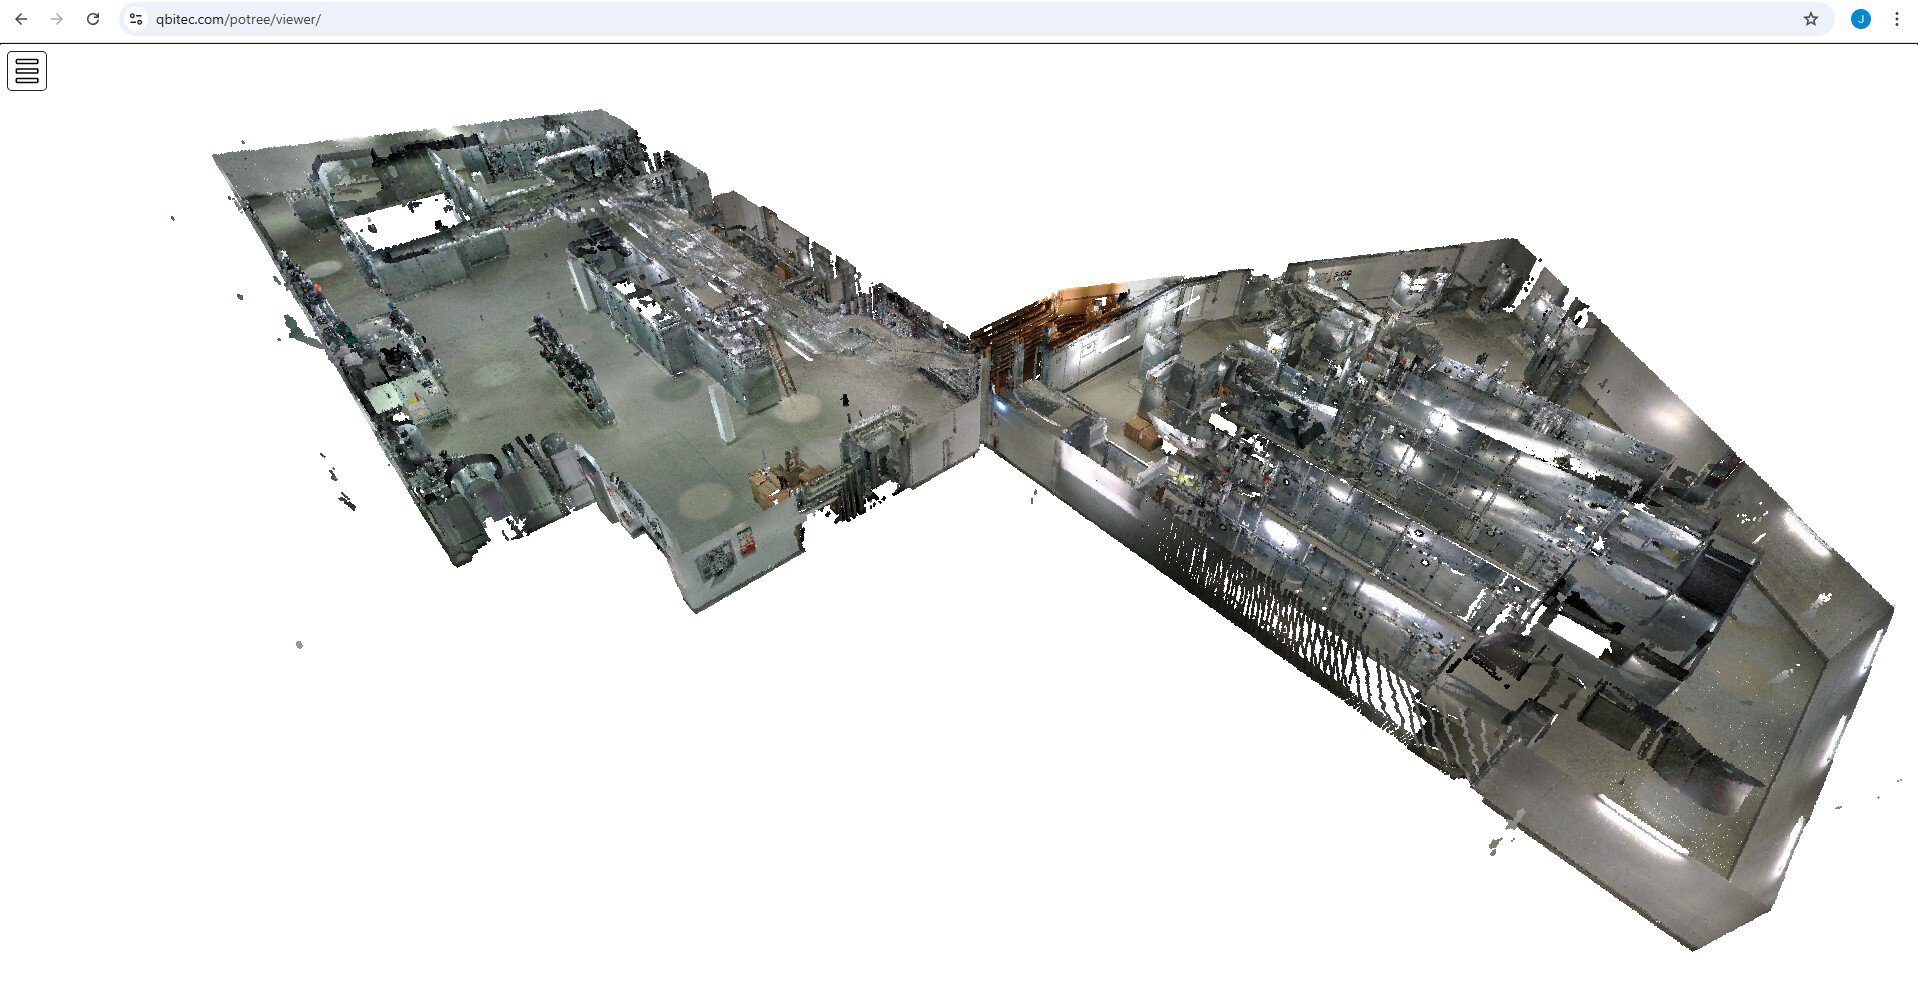
The result is an interactive viewer with mouse controls and various tools like here: https://qbitec.com/potree/viewer
Why share your point cloud online?
Point clouds are large, and sharing them as files is painful. Putting them on the web solves this: anyone you work with can explore the data directly in a browser, without installing software. That makes communication and coordination much easier.
- Clients and project partners simply click a link to view the scan.
- Surveyors can showcase their work publicly as a portfolio.
- Bonus for Revit users: with the Qbitec plugin, you can stream the same cloud directly into Revit (see "Bonus Step 2: Stream the point cloud directly into Revit").
A note on platforms: There are professional hosting services with collaboration tools and BIM features. They will always be more capable than our DIY setup. But to test the idea, or share data casually, you don’t need subscriptions, as Potree on simple webspace already gets you far.
Potree itself was developed at TU Wien (Vienna University of Technology). It displays huge point clouds directly in the browser using WebGL. Technically, it’s just static files (HTML + JavaScript + streamed tiles), so any webspace that allows direct file access works. Dropbox/OneDrive won’t, AWS S3 works with some setup, and classic hosting (under 10 €/month) usually works immediately.
Step 1: Prepare folders and convert your point cloud
Create a folder called potree and inside it a subfolder called data:
potree
└─ data
Now convert your point cloud into Potree’s streamable format. The official PotreeConverter works fine for LAS/LAZ (some PCs may warn because it’s unsigned).
Tip: If you want a GUI and support for more formats (E57, RCP/RCS, Z+F, Riegl), you can use the free Qbitec Converter instead. Please see "Bonus Step 1: Use the Qbitec Converter instead of PotreeConverter" for step-by-step instructions.
Note: The viewer will be public. For simple protection, use a less obvious folder name. For more protection add a .htaccess and .htpasswd file (instructions can be found online). For enterprise-level protection, a professional point cloud hosting platform is the way to go.
If you use the official PotreeConverter:
- Download: https://github.com/potree/PotreeConverter/releases/tag/2.1.1
- Extract the files somewhere.
- Open this path with the file explorer, click on the white space in the address bar, then enter "cmd" to open a command prompt.
- Run the following command to convert the files into the newly-created
datafolder:
PotreeConverter path/to/your_pointcloud.las -o path/to/potree/data --encoding BROTLI
Example (where your point cloud is stored in C:\pointclouds\mypointcloud.las and your potree folder is under C:\experiments:
PotreeConverter C:\pointclouds\mypointcloud.las -o C:\experiments\potree\data --encoding BROTLI
After conversion, your data folder should contain these files:
metadata.json
octree.bin
hierarchy.bin
Step 2: Get the (free) Potree viewer
Download the Potree Viewer code (v1.8.2):
https://github.com/potree/potree/releases/download/1.8.2/Potree_1.8.2.zip
and unzip it.
Now copy the viewer files into your potree folder like this:
- Copy the entire
libsfolder intopotree - Copy the entire
buildfolder intopotree, - Create a new folder inside
potreecalledviewer, - Inside
viewercopy the fileexamples/viewer.htmland rename it toindex.html
Your folder structure should now look like this
potree
├─ data
├─ libs
├─ build
└─ viewer
    └─ index.html
Step 3: Adapt the index.html to load your point cloud
Now we tell the Potree viewer which point cloud to load.
Open the file potree/viewer/index.html in a text editor of your choice.
-
First, we change the description text. Search for a line similar to this (around line 51):
viewer.setDescription("Point cloud courtesy of <a target='_blank' href='https://www.sigeom.ch/'>sigeom sa</a>");Replace it with your own text, for example:
viewer.setDescription("My point cloud for my customer"); -
Next, we point the viewer to the point cloud. Look for the line where the point cloud is loaded (around line 61):
Potree.loadPointCloud("../pointclouds/vol_total/cloud.js", "sigeom.sa", e => {Replace it so it points to the
metadata.jsonin yourdatafolder and give your point cloud a name:Potree.loadPointCloud("../data/metadata.json", "my pointcloud", e => {The first parameter is the path to the
metadata.json, the second is just an internal name that will show up in the viewer.
Step 4: Fine-tune the viewer (optional)
Now that the viewer is working, here are a few tweaks that improve the look and usability.
-
The default cloudy sky can feel distracting. To change it to white, search for this line:
viewer.setBackground("skybox");and replace it with:
viewer.setBackground("white");Other options are
"gradient"or"black". -
If you prefer the side bar to be automatically hidden, locate and remove this line:
viewer.toggleSidebar();The side bar will now be shown as an icon on the top left for the user to open it.
-
Remove the cats (loading background). The Potree developers added a small easter egg, that might not be for everybody. Potree briefly shows a tiled image of cats while loading. If you prefer a neutral look, delete this file:
potree/build/potree/resources/images/background.jpg
Step 5: Upload to your webspace
Now that everything is prepared locally, upload the potree folder to your webspace. You can use any method your hosting provider offers.
Using WinSCP (recommended):
- Install WinSCP
- Open it and enter the FTP/SFTP access data from your hosting provider
- Connect
- Drag the entire
potreefolder from your PC to the server - Wait until files are uploaded
Many web hosters also provide a simple browser-based file manager, which works fine too.
Done!
Congratulations! You have just become your own online point cloud provider.
Your point cloud will now be available inside a neat viewer under your domain. For example, if your domain is mycompany.test, then your point cloud viewer will be available under
https://mycompany.test/potree/viewer
(or if your web hoster does not automatically resolve index.html, then it's going to be https://mycompany.test/potree/viewer/index.html)
Please see Bonus Step 1 below on how to use the Qbitec Converter to convert more formats with a convenient UI and Bonus Step 2 on how to use our Revit plugin to use the point cloud data directly inside Revit, without downloading.
Bonus Step 1: Use the Qbitec Converter instead of PotreeConverter
The Qbitec Converter is part of the Qbitec plugin for Autodesk Revit. It can, however, also be used as stand-alone, without having Revit installed (and without a license, meaning it's free).
First, grab the latest version from the download page: https://qbitec.com/Download by clicking "Download the latest version"
Then proceed with these steps:


Next, we install the converter only. This can be done with a command line argument on the installer.
- Open the windows explorer and go to the "Downloads" folder
- Click somewhere in the empty space in the address bar
- A text entry appears, enter
cmdto open a command prompt - In the command prompt, type:
qbitecSetup-1.5.2 /ConverterOnly(replace "1.5.2" with the version you downloaded) - In the installer, select "Install for me only"
- Follow the installer instructions

The next step is to run the point cloud processor and setup a local data source.
- In the windows explorer, click the free space in the address bar and enter the following path
%localappdata%/Programs/Qbitec for Autodesk Revit/PointCloudProcessor.exeThis will open the converter directly, which is installed on your local programs folder. - A greeting window will appear, asking you to select the type of the data source. Select "Local or Network"
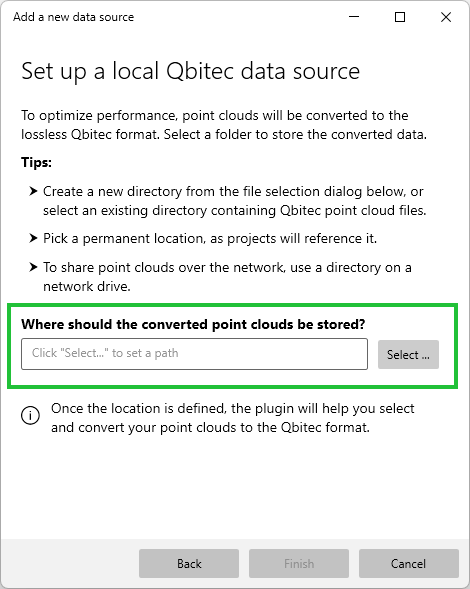
A new dialog opens. Please select an empty folder (do not use the data folder from Step 1, as the folder structure of the converted point cloud won't quite match).
Once the path has been set, press "Finish" to complete the data source setup.
Your overview of converted point cloud appears, still empty with a prompt to add you first point cloud.
Click "Add your first point cloud" to open the "Add a new Point Cloud" window.

A new dialog opens, allowing you to specify the source point cloud files to convert.
- On the lower left of the new window, click "Add files ..."
- A file browser will open, allowing you to select one or many files
- Repeat step 1 for all files you would like to add. While you are adding files, the point count and some estimates will update.
- Click "Start Conversion" once all files have been added to merge them into one converted point cloud.
The "Add a new Point cloud" dialog closes and a new tile appears on the point clouds overview, showing you the conversion progress.
Wait until conversion is done.
Please note: The Qbitec converter also extracts panorama images. As the Potree viewer does not support them, they are not needed for the subsequent steps.

Next, we need to copy the generated files to our data folder we created in Step 1.
- On the converted point cloud tile, click the gear icon on the top-right to reveal the properties popup.
- In the lower-right click the "Open Location" button
- The Windows explorer opens and points to the converted files
- Select the files
metadata.json,hierarchy.binandoctree.bin - Right-click and select "Copy"
- Navigate the explorer to the
datafolder created in step 1 and paste the files by right-clicking and selecting "Paste".
That's it, now you can proceed with prepare the Potree Viewer as explained above.
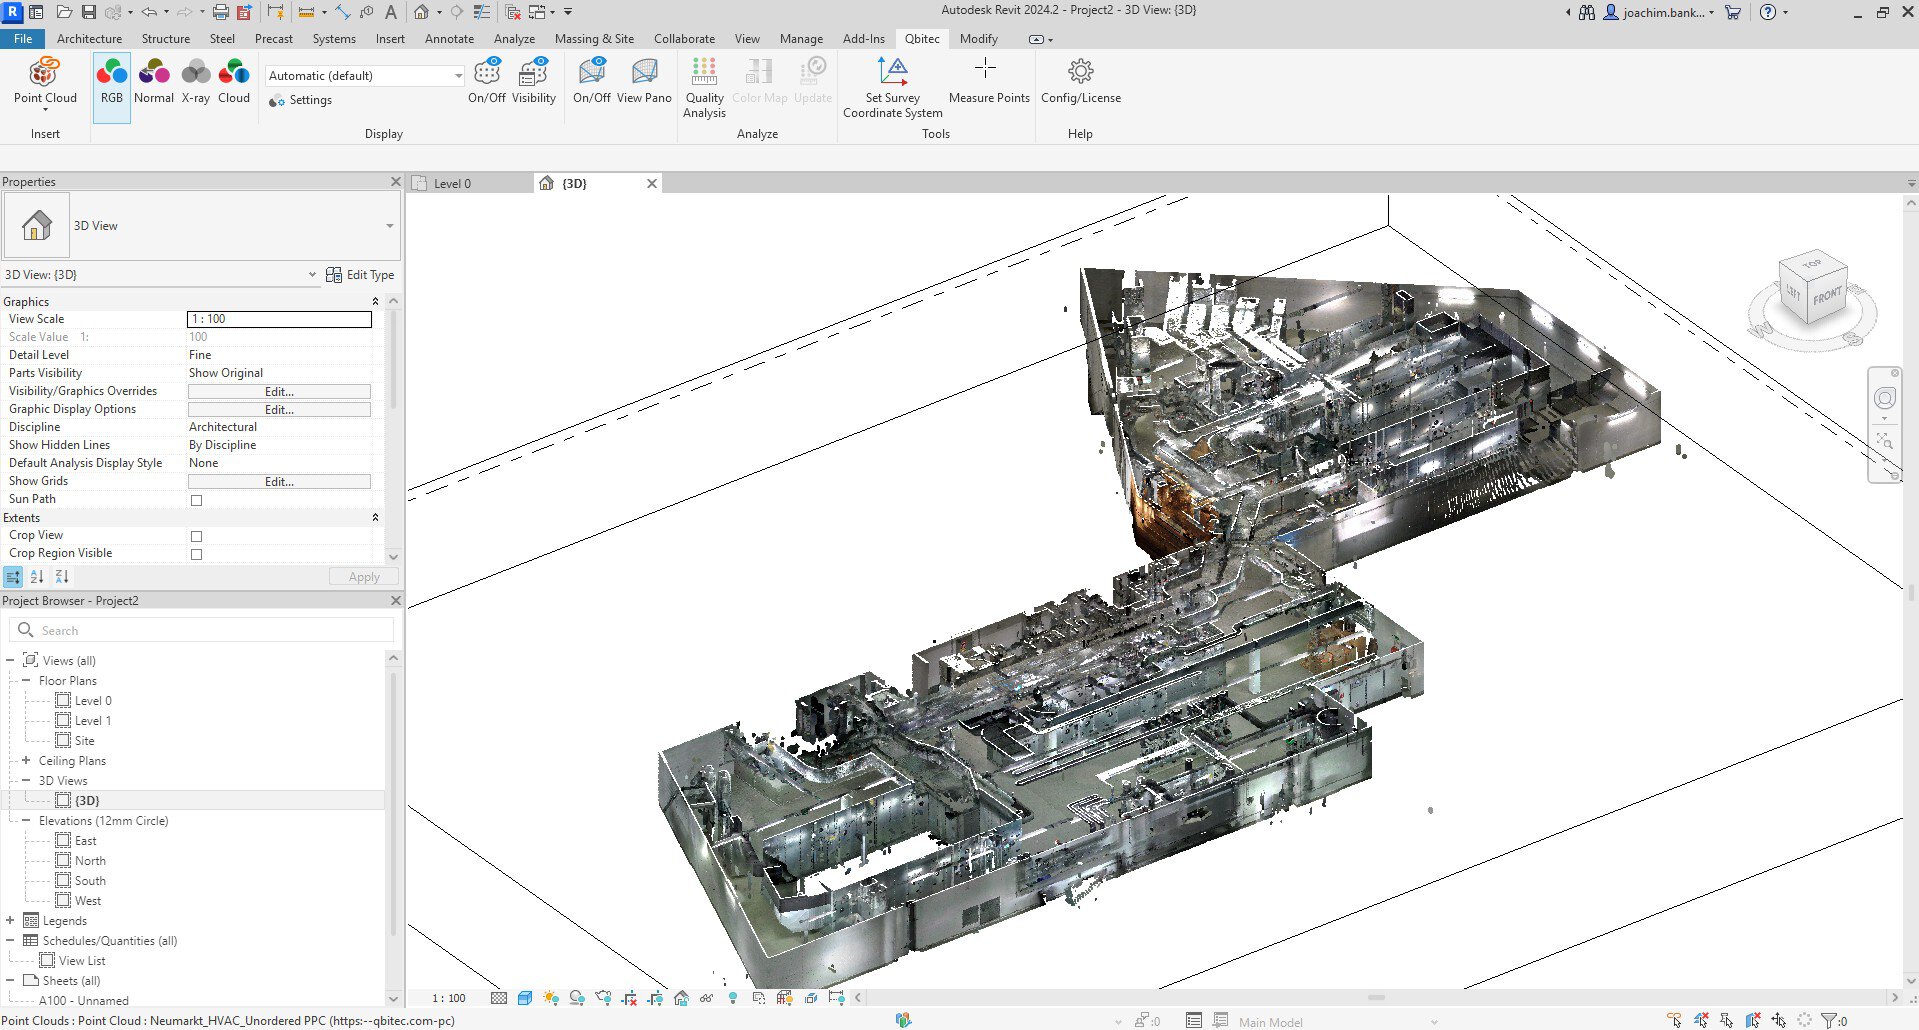
Bonus Step 2: Stream the point cloud directly into Revit
If you have an active license for the Qbitec Revit plugin (and of course a Revit license), you can easily add the point cloud from your online source directly into your document.

- Start Revit
- Create a new document
- Switch to the Qbitec tab
- In the "Insert" group, click the arrow on the button "Point Cloud"
- In the context menu, select "Public URL"

A dialog appears, prompting you to enter the url of the point cloud data.
- Enter the URL of the data folder that you uploaded. For example, if your domain name is mycompany.test, then enter
https://mycompany.test/potree/data - Click the "Insert" button and select one of the insert modes
And there it is - your self-hosted point cloud directly usable inside Revit.