
Is Revit Slow with Point Clouds? Causes, Fixes and Better Workflows
Point clouds are a great reference for reality-based modeling in Revit. But as scan projects become larger and more detailed, they can become a significant performance bottleneck.
Typical symptoms in Revit include:
- Slow interaction when panning, zooming or orbiting,
- Long waiting times before a view becomes interactive after opening it or switching between views,
- Point clouds taking a long time to appear or disappearing temporarily during interactions,
- Revit becoming temporarily unresponsive,
- In extreme cases, a slowdown of the entire machine.
If you experience these symptoms, Revit may be struggling with the amount of point-cloud data it has to process.
This article explains what affects point-cloud performance in Revit, which optimizations are worth trying, and when it makes sense to reconsider the point-cloud workflow itself. The tips below are ordered from simple things to try first to more involved changes that modify the point-cloud data itself.
Are point clouds really the problem?
Revit is heavy, and displaying complex models can challenge your system even without point clouds. So before blaming the good ol' point cloud, check the performance without it.
To do this, temporarily unload the point cloud. Then test interactions such as orbiting views, switching views or placing elements. If performance is okay again, the point cloud is likely a major part of the problem.
If Revit remains slow, investigate the model itself, linked files and add-ins before focusing on the scan data.
System Optimizations
Before changing the point-cloud data itself, start with the environment in which Revit is running. View settings, snapping, storage, graphics configuration and available memory can all affect performance and many of these issues can be tested or fixed without touching the original scan data.
Reduce the Number of Visible Points in the Current View

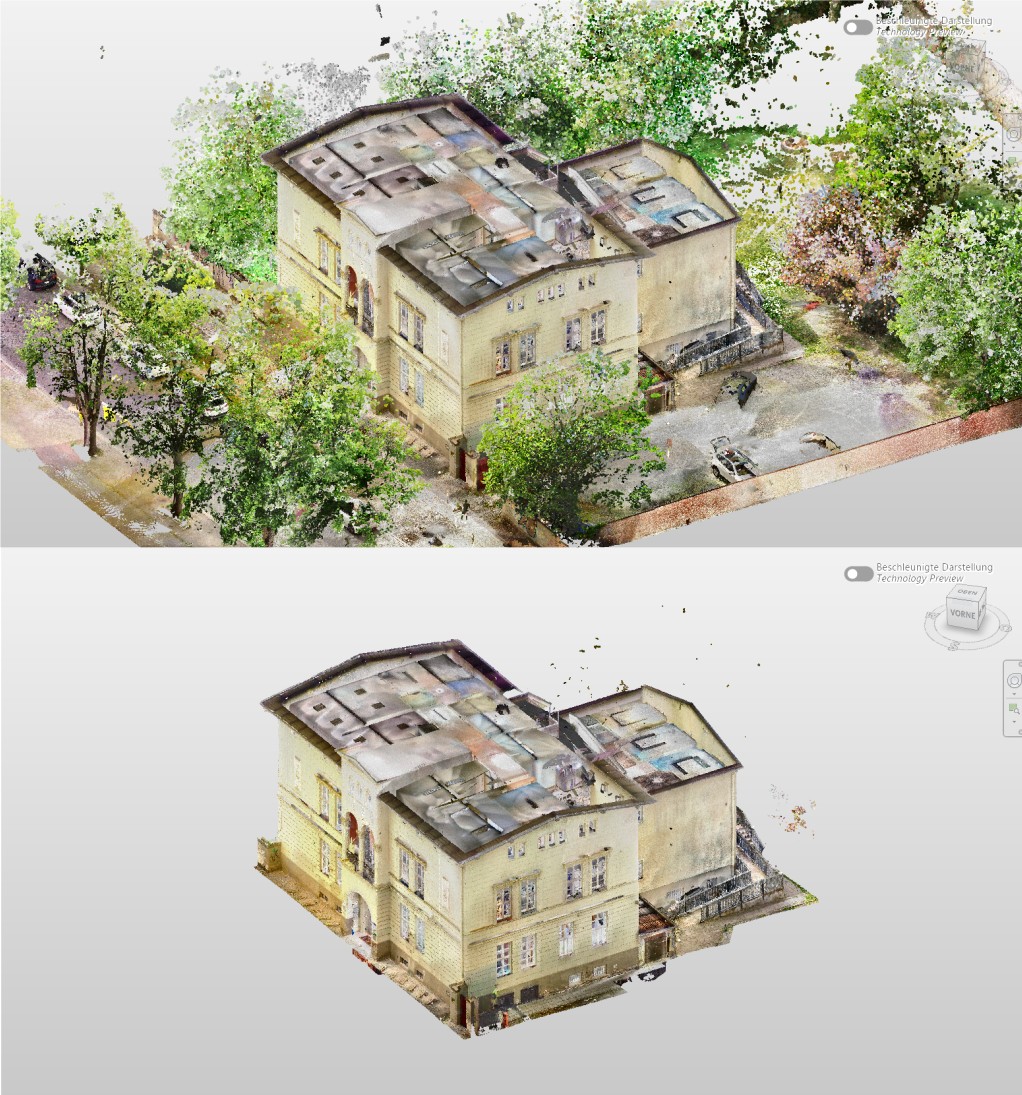
Top: the entire point cloud contains way more information than needed at the moment. Bottom: Revit's section box was used to reduce the visible point cloud to one area of interest
One of the main performance factors is not necessarily the total point count, but the number of points currently visible in the Revit view (also see Autodesk's point-cloud performance guidance).
A large site scan viewed through a tightly cropped section may perform better than a smaller dataset displayed in its entirety. The latter is often the case in free 3D views rather than section or plan views.
What to try:
- Use section boxes in 3D views.
- Crop plans and sections to the area you are actively modeling, for example by reducing the depth of a section.
- If you have multiple point clouds in your project, disable all point clouds that are not currently needed for the task at hand.
Turn Off Point Cloud Snapping
Revit has a feature that detects points and planar surfaces inside point clouds so that walls, lines and other elements can snap into place and thus be aligned with the scan.
During interaction, for example, while moving the mouse to place an object, Revit searches the local point database to identify suitable geometry. While useful, this can require a considerable amount of additional processing. The impact can be especially noticeable while drawing elements or navigating dense point clouds.

What to try:
If you do not currently need it, disable Snap to Point Clouds and compare the result. To disable it:
- Open the Manage tab in Revit.
- Select Snaps in the Settings panel.
- Under Object Snaps, clear Snap to Point Clouds.
- Click OK.
The setting can be enabled again whenever you need to snap model elements to the scan. The option and the corresponding PC keyboard override are documented in Revit's Snaps dialog.
Make Sure Revit Is Using the Right GPU
Modern laptops and workstations often contain more than one graphics processor. A common configuration is an integrated Intel or AMD GPU optimized for power efficiency and a dedicated NVIDIA or AMD GPU intended for demanding graphics workloads.
If Revit runs on the integrated adapter, the good graphics card may simply be sitting there unused. Although Revit's point-cloud performance appears to be CPU-bound for many operations, and Windows should theoretically select the appropriate graphics card automatically, forcing the system to use the high-performance adapter can improve graphics performance.
What to try:
First, verify that Hardware Acceleration is enabled in Revit so that Revit actually uses the graphics card for rendering.
Go to: File → Options → Hardware
The Hardware Setup section shows the video card currently used by Revit, along with its driver information. Make sure Use hardware acceleration is enabled. Revit also provides the Draw visible elements only option here, which can improve navigation performance in complex 3D views.
If the wrong GPU is being used, you can force Windows to use the high-performance device:
- Close Revit.
- Open Windows Settings.
- Go to System → Display → Graphics.
- Find Revit in the list of applications. If it is not listed, add Revit.exe as a desktop application.
- Select Revit and click Options.
- Select your high performance device.
- Restart Revit.
Make Sure the Point Cloud Is on a Fast Device
Point clouds are large datasets and require continuous data access.
In a native Revit workflow, point clouds should ideally be stored on fast local storage. This also applies to workshared projects, where local point-cloud copies can improve performance and reduce network traffic.
This becomes particularly noticeable when comparing a local SSD with a slower network connection. If an additional VPN is in the middle, getting decent point-cloud performance can become very difficult.
Loading point clouds from USB flash drives can also work reasonably well if the drive and connection provide sufficient bandwidth, such as a fast USB 3.x device. However, a local SSD is generally the safer choice for consistent performance.
What to try:
Check whether your point cloud is stored on a fast device. If it is located on a slow drive or network share, make a local copy and relink the point cloud in Revit to the new location.
Make Sure Revit Has Sufficient RAM Available
Point clouds consume substantial system resources.
Once physical RAM is exhausted, Windows starts using virtual memory, which is mapped to a file on your storage device. At this point, memory operations that would normally happen in fast physical RAM may require much slower disk access, which can slow down not only Revit but the entire system.
What to try:
Open Task Manager while working in a problematic view, for example by pressing Ctrl + Shift + Esc.
In the Processes tab, locate the Memory column and check whether total memory usage is approaching 100%.
If this is the case, free up memory by closing applications you do not currently need. Click the Memory column to sort applications by memory consumption and check the Name column to identify the biggest offenders.
Typical candidates are another open instance of ReCap or browsers such as Google Chrome.
If memory usage regularly approaches the physical limit even with unnecessary applications closed, adding more RAM may be worth considering.
Point Cloud Optimizations
If the system-side changes above are not sufficient, the next step is to look at the point cloud itself.
The goal is to reduce the amount of unnecessary data Revit has to process. Start with cleanup, which improves the dataset itself, before moving to more destructive measures such as decimation or splitting the cloud into multiple working files.
Clean Up the Point Cloud
Not every captured point is useful for BIM work.
Typical datasets may contain:
- People or vehicles captured during scanning,
- Temporary objects,
- Noise and stray points,
- Reflection artifacts around glass or other reflective surfaces,
- Objects outside the actual project area,
- Surrounding context that is irrelevant to the modeling tasks.
There is little value in asking Revit to process data that is not needed for the project.
Removing these parts can be a tedious task, but it is usually worth the effort. In fact, cleanup should be considered basic data preparation and should ideally be done regardless of which software will later consume the point cloud.
Cleanup can happen inside the registration software or directly in ReCap.
A basic ReCap workflow looks like this:
- Open the complete point-cloud project.
- Use selection tools such as Window, Fence or Plane Selection to isolate unwanted points.
- Delete noise, reflections and irrelevant objects.
- Save and optimize the project.
After points have been deleted, ReCap can optimize the scan and incorporate the deletion state into the point-cloud data. Depending on the selected optimization method, deleted points can also be permanently removed.
Make sure you retain an untouched copy of the original scan data before permanently deleting points.
Check the Coordinate Setup
Georeferenced scan data typically uses large real-world coordinates.
Revit models, on the other hand, generally work best when model geometry remains reasonably close to the internal origin.
If the point cloud is located very far from the model origin, it can exceed Revit's coordinate limits. This can lead to display and positioning problems and, depending on the setup, data that is outside the useful project area may still have to be handled.
Revit explicitly warns when point-cloud coordinates exceed its supported range. Correctly setting up the Survey Point and shared coordinates is therefore important when working with georeferenced data.
In essence, the model is kept in a coordinate system that is convenient for Revit, while shared coordinates establish the relationship between the local Revit model and its real-world position. See our video tutorial Georeferencing Point Clouds in Revit with Qbitec for a complete workflow.
Split the Point Cloud into Working Sections
Dividing a large point cloud into more manageable chunks and loading only the sections currently needed is perhaps the most established approach. In theory, this scales almost indefinitely. The downside is significantly more complex data management and potentially many redundant copies.
How the point cloud should be divided depends on how your team works.
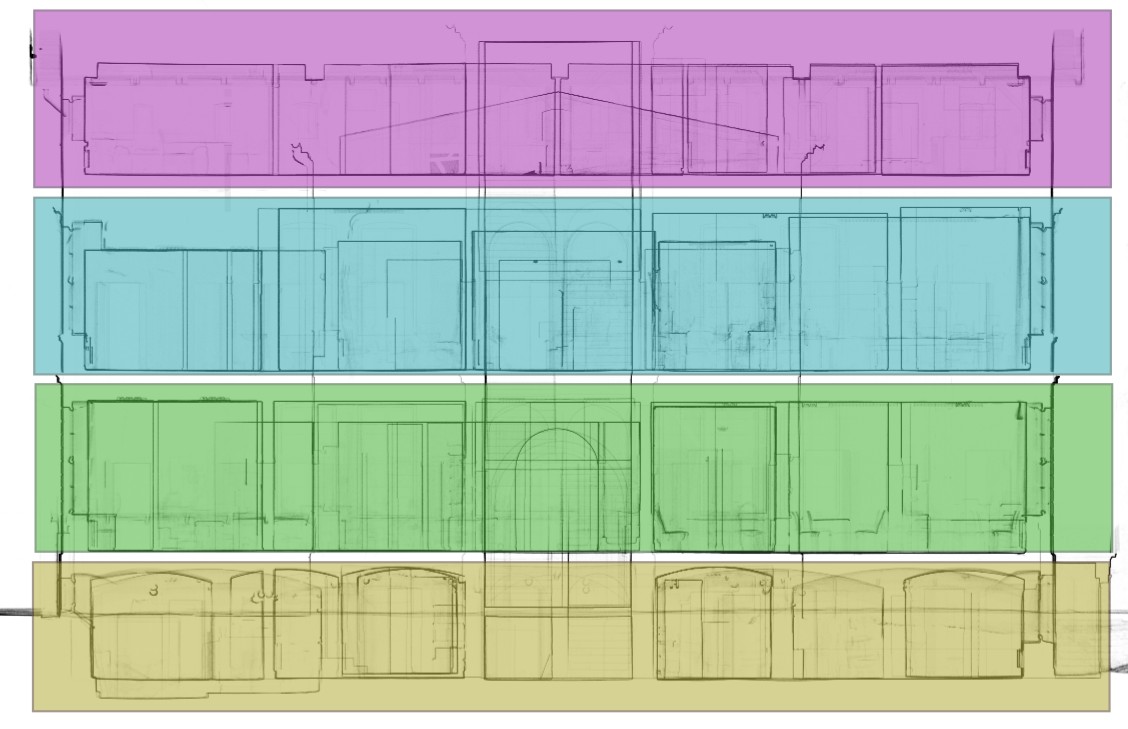
Typical working sections include:
- One file per floor,
- One file per building,
- Production areas,
- Sections of an industrial facility,
- Separate interior and exterior datasets.
This can also be done in ReCap by placing limit boxes and exporting only what’s within.
Decimate the Point Cloud
This one hurts, but it is sometimes necessary when working with native Revit.
If cleanup, visibility settings and hardware checks are not sufficient, reducing point density can provide a significant performance improvement at the expense of captured detail.
Always keep the original scan data and create a separate optimized working copy. As with cleanup, decimation can be performed in most point-cloud registration systems or in ReCap. A higher decimation value produces a sparser point cloud. Keep in mind that this reduces geometric detail, so the appropriate value depends on what you need to model.
The workflow is described in more detail in ReCap's guide to extracting and decimating point clouds.
But is removing detail really the last resort? There are better ways to incorporate point cloud data into your project.
Checklist Native Revit
The following table summarizes the tips for native Revit, ordered roughly by simplicity and by how much they interfere with the original data.
| Check | What to try | Trade-off |
| Visible data | Crop views and use section boxes | None outside the current view |
| Point-cloud snapping | Disable when not required | Snapping temporarily unavailable |
| Storage | Move the point cloud to a fast local SSD | Requires a local copy |
| GPU | Enable hardware acceleration and verify the high-performance GPU | None |
| RAM | Close unnecessary applications and monitor memory usage | May require a RAM upgrade |
| Unnecessary scan data | Remove noise, reflections and irrelevant context | Can take considerable amount of time |
| Coordinates | Check the point cloud's location and shared-coordinate setup | May require coordinate configuration |
| Point density | Decimate a separate working copy | Geometric detail is removed |
| Dataset size | Split the cloud into working sections | More files and more data management |
Is There a Simpler Way?
For occasional point-cloud work, the optimizations above may be completely sufficient.
The situation changes when large reality-capture datasets are part of everyday production. In this case, the workarounds above may gradually become the actual workflow.
Imagine a large building or industrial facility that needs to be modeled across several floors and disciplines. To maintain acceptable performance, the team may have to:
- Clean the original scan,
- Divide it into smaller datasets,
- Create reduced-density working copies,
- Export or index those datasets,
- Distribute local copies,
- Load and unload different parts depending on the current modeling area,
- Repeat parts of the process when the source dataset changes.
At this point, the issue has become a data-management problem as well. Cleanup is good practice regardless of software. Removing reflections or irrelevant objects improves the quality of the working dataset. But splitting and decimating otherwise useful scan data purely to keep the BIM application responsive is a different type of compromise.
If a project repeatedly requires these steps, it is worth asking whether the workflow itself can be adjusted so that the complete useful dataset remains available without all this preparation.
Load the Data You Actually Need
This is the problem the Qbitec for Revit add-in was designed to address.
Instead of requiring users to manually divide a large dataset into increasingly small working files, Qbitec prepares the point cloud for interactive access and dynamically loads the portions and levels of detail required for the current view.

The data can come from a local storage, your company network, or supported online sources such as HTTPS servers or NavVis IVION.
Because Qbitec streams the points and levels of detail required for the current view, even datasets containing billions of points can remain available without manually splitting them into small working sections or permanently reducing their density.
Summary
If point clouds make Revit slow, start with the simple things before modifying the scan data. Reduce the amount of data visible in the current view, disable point-cloud snapping when you do not need it, make sure the data is stored on a fast device, verify that Revit is using the correct GPU, and check whether sufficient RAM is available.
Next, look at the dataset itself. Remove noise, reflections and irrelevant context, and make sure georeferenced data is positioned correctly. If the point cloud is still too demanding, decimation and splitting it into working sections are established ways to reduce the load, but both come with trade-offs.
For occasional point-cloud projects, these steps may be all you need. If splitting, decimating, copying, loading and unloading point-cloud files becomes part of your daily Scan-to-BIM workflow, however, too much time might be spent with data preparation.
Qbitec for Revit takes a different approach by loading the point-cloud data and level of detail required for the current view while keeping the useful dataset available.