
Manage Point Cloud Locations in a Revit Document
The Manage Point Cloud Locations dialog allows you to assign, manage, and remove locations for point clouds used in the project. To open the dialog click on the Manage Point Clouds button in the Qbitec ribbon.
A single point cloud can have multiple possible locations, and the system automatically checks these locations from top to bottom and uses the first available location.
This allows multiple users or machines to work with the same project even if point clouds are stored in different locations or require individual credentials to a remote source.
Typical Use Cases
Local Point Clouds
- A point cloud was moved to a different folder and the path must be updated.
- Multiple users work on the same Revit project but store point clouds in different local directories.
- An updated version of a point cloud should transparently replace the existing file.
Example:
User A inserts a point cloud from the path C:\Users\UserA\Projects. User B works on the same project but stores their point clouds in C:\Users\UserB\MyOtherProjects.
When User B opens the project for the first time, they can add their directory as an alternative search location. When the project is opened: User A uses the first location C:\Users\UserA\Projects, while User B automatically uses the alternative location C:\Users\UserB\MyOtherProjects.
Remote Point Clouds (e.g., NavVis IVION)
- Multiple users access the same point cloud with individual login credentials.
- User credentials or the remote instance have changed.
- The project is opened on a new machine where the remote source is not configured yet.
Example:
When User B opens the project for the first time, they add their own credentials to the point cloud location. Afterward: User A automatically connects using UserA, while User B connects using UserB.
Dialog overview
The following screenshot shows the main areas of the Manage Point Cloud Locations dialog.
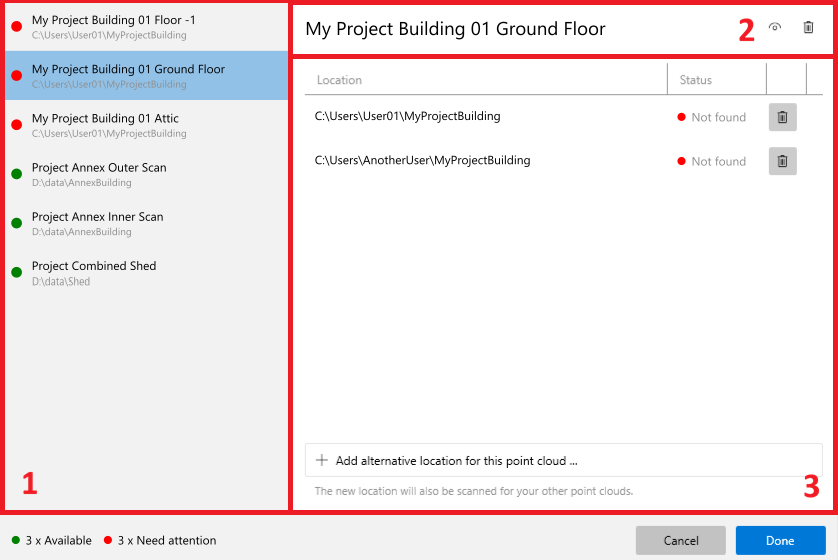
1 Point Cloud List
The left side of the dialog displays the list of point clouds used in the project. Each entry contains the following information:
- Name: The name of the point cloud.
- Selected Path: The currently active location.
- Availability Indicator: Shows whether the point cloud can be found at the selected location. A green dot means the point cloud is available; a red dot means it is unavailable and needs attention.
Click a point cloud entry to display its details on the right side of the dialog.
2 Header Area
The header area shows the selected point cloud name and provides the following actions:
- Preview Point Cloud
Opens a popup 3D view showing the point cloud. This button is only enabled if the point cloud is available. - Schedule for Removal
Marks the point cloud for removal when the dialog is confirmed. The point cloud name is displayed with strikethrough text. Clicking the button again before confirming reverts the removal.
3 Locations Area
The locations area lists all stored locations for the selected point cloud. The list is evaluated from top to bottom: the first available location is used.
Location
Shows the current location, for example C:\Users\User01\MyProjectBuilding (local path) or UserA@myinstance.iv.navvis.com (NavVis location).
Status
Shows the availability of the point cloud at the location.
The following status values are possible:
| Status | Description |
|---|---|
| OK | The point cloud is available at this location. |
| Not Found | The point cloud is not present at this location. |
| Needs Setup | Remote locations only. Availability cannot be determined because the remote source is not set up. |
| Needs Login | Remote locations only. Availability cannot be determined because you are not logged in. |
Button "Add Alternative Location for this Point Cloud"
If no suitable source is available, or if you select the last entry Add Location ..., the corresponding setup wizard starts.
| Point Cloud Type | Wizard |
|---|---|
| Local Point Clouds | A directory selection dialog is shown. |
| NavVis Point Clouds | The NavVis project source setup dialog is shown. |
| HTTP Point Clouds | A dialog to enter a HTTP address is shown. |
After source creation or selection, the location is scanned for the selected point cloud. If found, the location is added. Otherwise, an error message is shown.
Automatic detection of related point clouds
When a valid location is found for the selected point cloud, the system also scans the parent directory (or the remote location) for other point clouds belonging to the same project. If additional project point clouds are discovered there, you will be asked whether their locations should be updated as well.
This allows multiple point clouds to be reassigned with only a few clicks instead of updating each one individually.
Example
Assume the new location for the current point cloud is C:\MyPointClouds\PC_A. If another point cloud of the same project exists at C:\MyPointClouds\PC_B, it will automatically be detected because it is located in the same parent directory.
You can then choose to update this additional point cloud location as well.
Location Actions
The following actions are available depending on the current status of the location.
| Action | Required Status | Description |
|---|---|---|
| Remove Location | All states | Removes the location from the list of possible locations for the selected point cloud. |
| Set Up | Needs Setup | Starts the project source setup wizard for the remote source. A new remote location is configured using the same instance URL but you may choose the same or a different user name for the connection. |
| Log In | Needs Login | Starts the login process for the remote source. The user mentioned in the location (the part before the @) must authenticate to access the point cloud. |
Applying the changes
Once point cloud locations have been updated, or point clouds have been scheduled for removal, click the Done button to apply the changes and store the alternative paths in the project. A dialog will appear requesting you to save and reload your project.